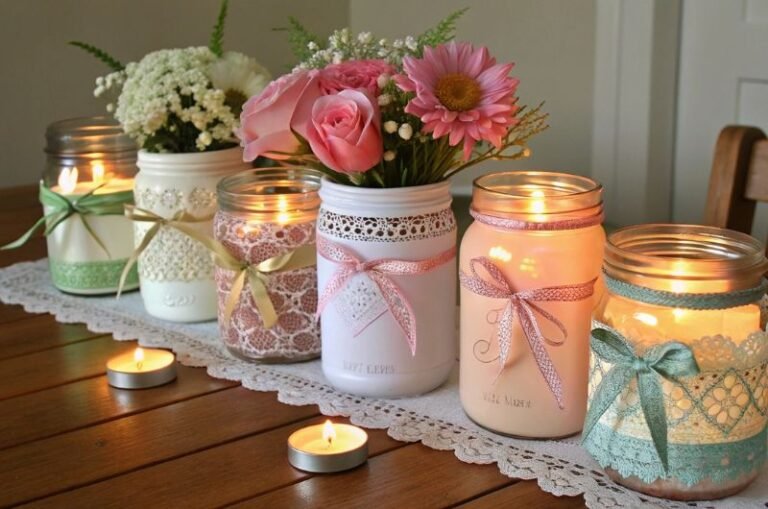
15 DIY Clay Flower Pot Crafts for a Lively Garden
Grab your favorite mug of coffee (or tea, no judgment here), and let’s dive into the world of DIY clay flower pot crafts.
Whether you’re a seasoned crafter or just looking for a cozy way to spend a lazy afternoon, this is your go-to guide for making adorable, Pinterest-worthy flower pots that’ll make your plants (and your heart) happy.
Let’s get our hands a little messy, unleash some creativity, and make something beautiful together. Sound good? Let’s go!
Before we start, let’s gather our supplies. Don’t worry, most of these are probably already lying around your house or can be snagged at your local craft store:
- Air-dry clay or polymer clay (your choice, depending on how durable you want your pots to be)
- A rolling pin (or a smooth bottle if you’re improvising)
- A small knife or clay cutting tool
- Acrylic paints and brushes
- A clear sealant (mod podge or varnish works great)
- A small bowl or container to use as a mold
- Optional: Stamps, stencils, or texture tools for decorating
1. The Classic Handmade Clay Pot
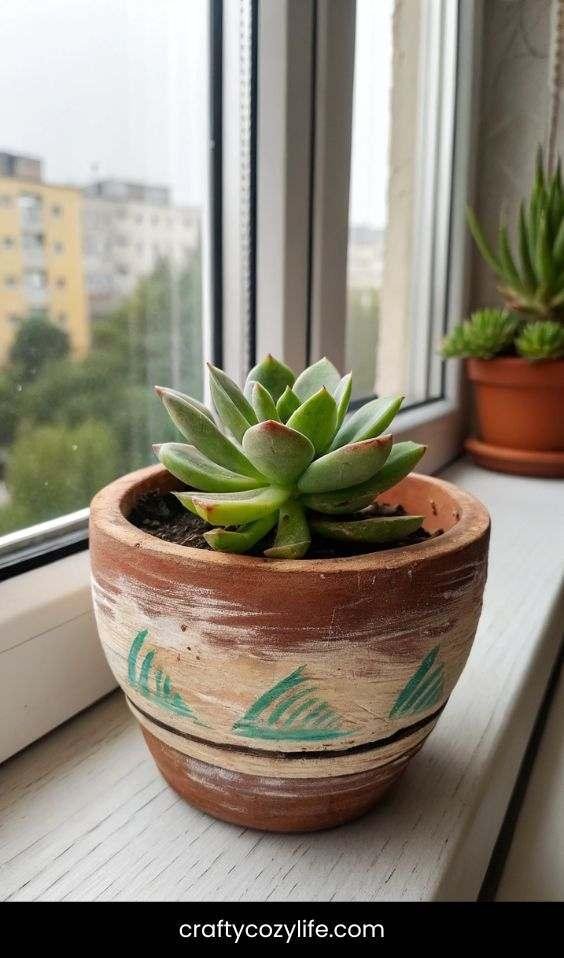
Let’s start with the basics—a simple, handmade clay flower pot that’s perfect for beginners.
Step-by-Step:
- Roll It Out: Take a chunk of clay and roll it out to about ¼ inch thickness. Think of it like rolling out cookie dough—smooth and even.
- Cut Your Base: Use a small bowl or container as a guide to cut out a circular base for your pot.
- Build the Walls: Cut a rectangular strip of clay long enough to wrap around your base. Gently press the edges together to form the walls of your pot. Smooth out any seams with your fingers or a little water.
- Shape It: Use your hands to shape the pot, making sure the walls are even. You can flare the top out for a more organic look or keep it straight for a modern vibe.
- Let It Dry: Follow the instructions on your clay packaging for drying time. Air-dry clay usually takes 24-48 hours, while polymer clay needs to be baked.
- Paint & Seal: Once dry, paint your pot in your favorite colors and seal it with a clear varnish to protect it from water.
Picture This:
Imagine a rustic, handcrafted clay pot sitting on your windowsill, holding a tiny succulent or a sprig of lavender. The earthy texture of the clay pairs perfectly with the vibrant green of the plant, and the subtle brushstrokes of paint add just the right touch of personality. It’s a little piece of DIY clay flower pot magic that you made with your own two hands.
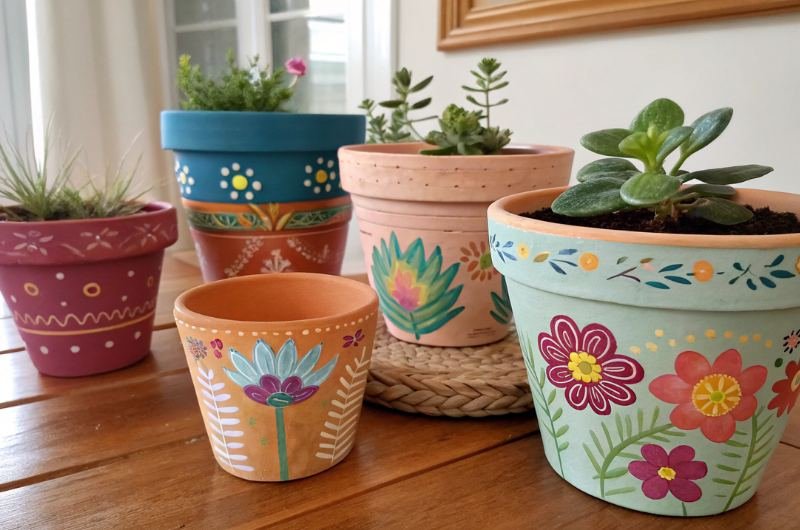
2. Textured & Stamped Pots
Ready to level up? Let’s add some texture and patterns to your pots for a more artistic look.
Step-by-Step:
- Roll & Cut: Roll out your clay and cut out your base and walls as you did in the first project.
- Add Texture: Before assembling, press textures into the clay. Use lace, leaves, or even a piece of burlap to create unique patterns. You can also use stamps or carve designs with a toothpick.
- Assemble: Form your pot as before, making sure to handle the textured areas gently to preserve the design.
- Dry & Paint: Let your pot dry, then use a dry brush technique to highlight the raised textures with paint. Seal with varnish.
Picture This:
Picture a set of three textured clay pots, each with a different pattern—one with delicate lace imprints, another with leaf veins, and the last with geometric stamps. They sit together on a wooden shelf, catching the sunlight and casting tiny shadows that dance across the surface. Your DIY clay flower pots are now a mini art installation in your home.
3. Miniature Fairy Garden Pots
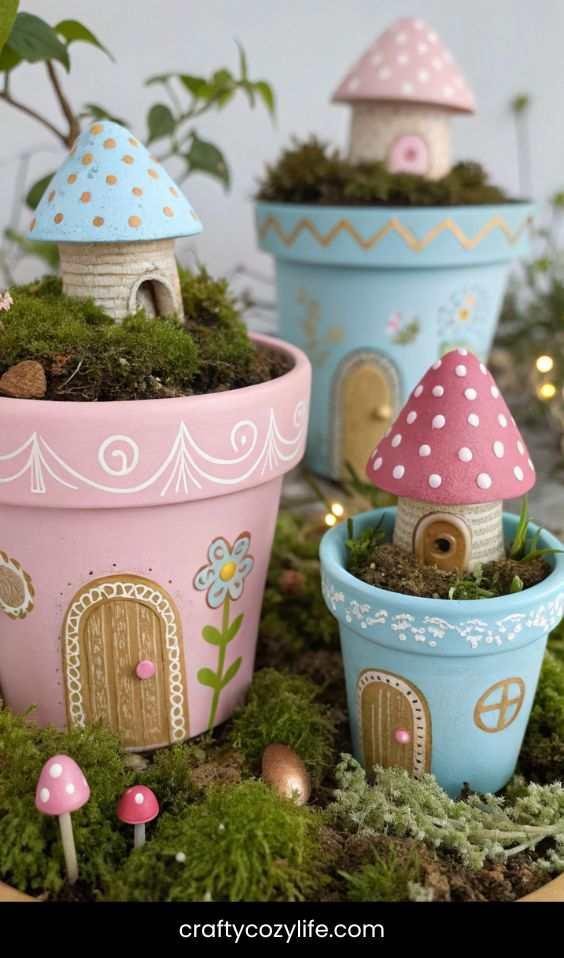
Feeling whimsical? Let’s create tiny pots perfect for a fairy garden or as adorable gifts.
Step-by-Step:
- Roll Tiny: Roll out your clay and cut small circles for the base (think bottle cap size).
- Build Mini Walls: Cut thin strips of clay and wrap them around the base to form tiny pots. Use your fingers to smooth the edges.
- Add Details: Use a toothpick to carve tiny designs or add little clay flowers or leaves to the sides.
- Dry & Paint: Let them dry, then paint with pastel colors or metallic accents for a magical touch.
- Seal & Display: Seal with varnish and place them in a fairy garden or use them as plant markers in larger pots.
Picture This:
Envision a cluster of miniature clay pots nestled among moss and tiny figurines in a fairy garden. Each pot is a tiny masterpiece, painted in soft pinks, blues, and golds, with delicate patterns that catch the light. It’s like stepping into a magical world, all thanks to your DIY clay flower pot creations.
4. Painted Ombre Pots
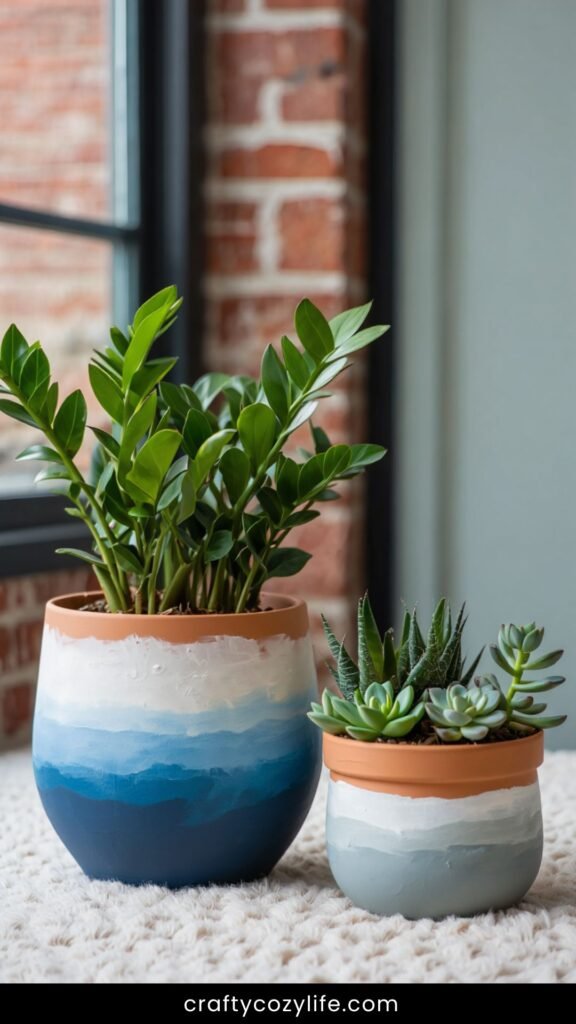
For the color lovers out there, let’s create a gradient ombre effect that’s totally Insta-worthy.
Step-by-Step:
- Roll & Assemble: Create your pot as usual, but keep the surface smooth for painting.
- Choose Your Colors: Pick two or three shades of acrylic paint that blend well together.
- Paint the Base: Start with the darkest color at the bottom and blend upward, adding water to the paint to create a smooth gradient.
- Let It Dry: Allow the paint to dry completely before adding a second coat if needed.
- Seal It: Finish with a clear sealant to protect your ombre masterpiece.
Picture This:
Imagine a row of ombre clay pots on your patio, each one transitioning from deep navy to soft sky blue, or from vibrant coral to pale pink. The gradient effect is so mesmerizing that you can’t help but smile every time you walk by. Your DIY clay flower pots are not just plant holders—they’re a burst of color and joy.
5. Personalized Initial Pots
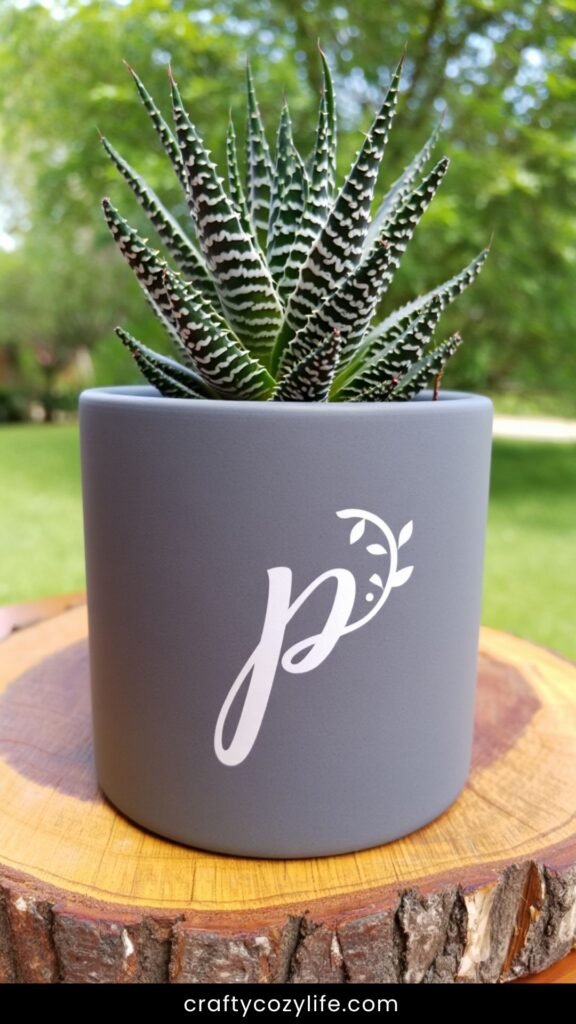
Let’s make something truly unique—pots with your initials or meaningful symbols.
Step-by-Step:
- Roll & Cut: Create your pot as usual, but leave the surface smooth.
- Add Your Initials: Use alphabet stamps or carve your initials into the clay before it dries.
- Paint & Highlight: Once dry, paint the pot in a solid color, then use a contrasting shade to highlight the initials.
- Seal It: Finish with a clear sealant to protect your design.
Picture This:
Picture a set of personalized clay pots on your desk, each one bearing the initial of a family member. The pots are painted in soft neutrals, with the initials standing out in bold gold. They’re not just pots—they’re a little piece of your story, crafted with love.
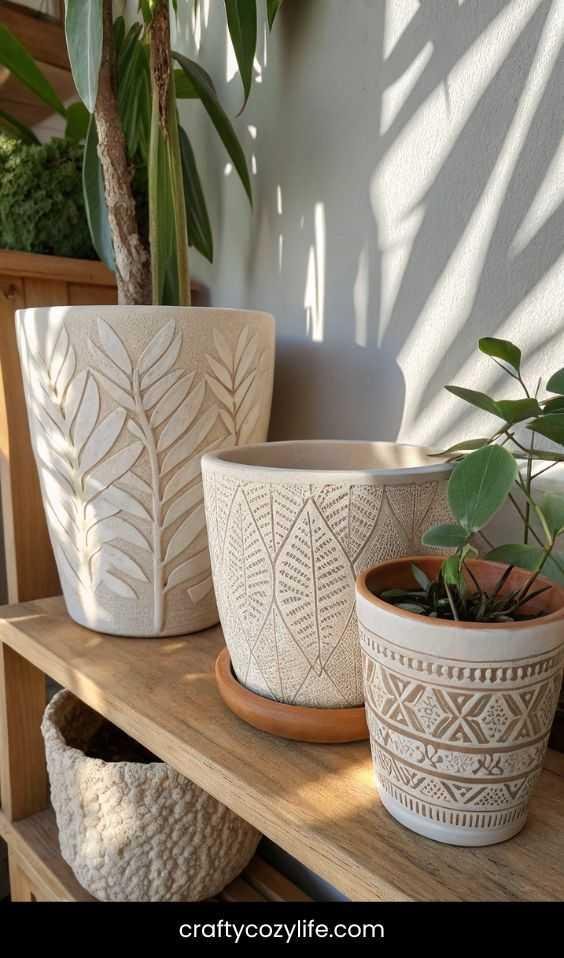
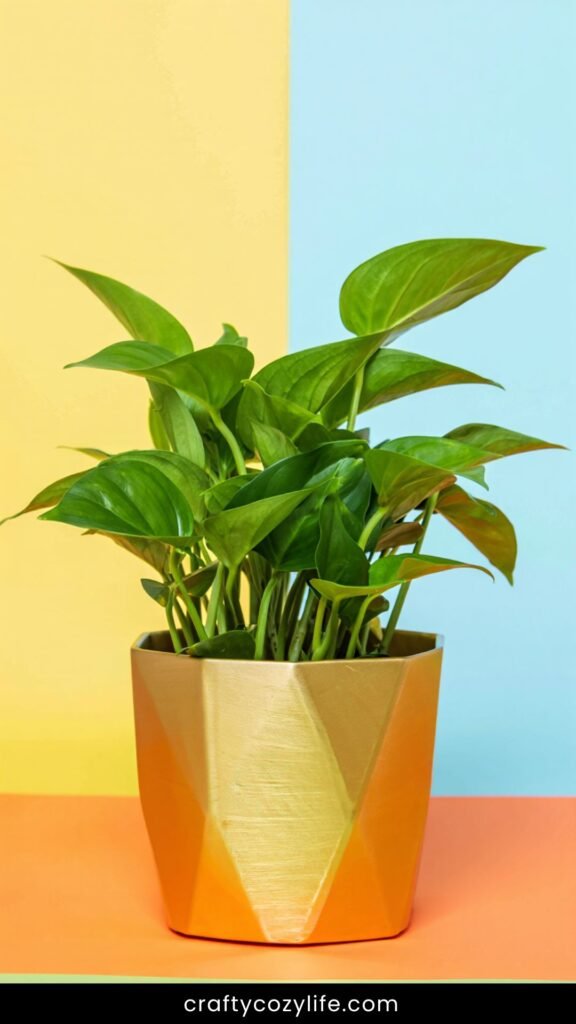
6. Geometric Modern Pots
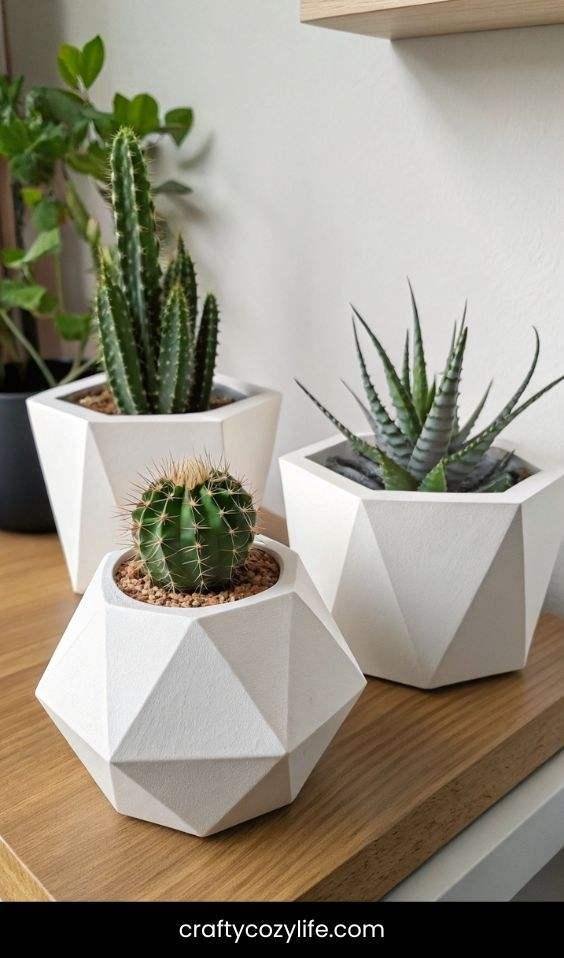
For the minimalist at heart, these geometric pots are sleek, stylish, and oh-so-satisfying to make.
Step-by-Step:
- Roll & Cut: Roll out your clay and cut it into geometric shapes like triangles, hexagons, or rectangles.
- Assemble: Use a small bowl as a mold and press your clay shapes around it, smoothing the edges to create a seamless look.
- Add Details: Use a ruler or straight edge to carve clean lines or patterns into the clay.
- Dry & Paint: Let it dry, then paint in monochrome colors like black, white, or gray for a modern vibe.
- Seal It: Finish with a matte sealant to keep it looking sleek.
Picture This:
Imagine a trio of geometric clay pots on your desk, each one a different shape but all painted in crisp white. The clean lines and sharp angles catch the light, creating a modern, gallery-worthy display. Your DIY clay flower pots are the epitome of chic simplicity.
7. Marbled Clay Pots
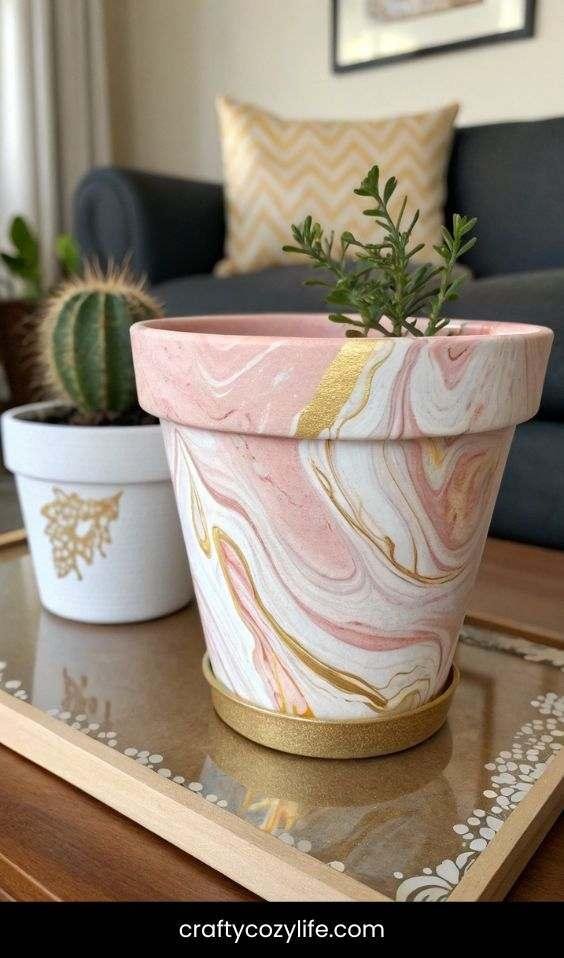
Marbling is a fun and easy way to add a touch of elegance to your pots.
Step-by-Step:
- Mix Colors: Take two or three colors of clay and gently knead them together without fully blending them.
- Roll It Out: Roll the marbled clay into a sheet and cut out your base and walls.
- Assemble: Form your pot as usual, letting the marbled pattern shine.
- Dry & Seal: Let it dry, then seal with a glossy varnish to enhance the marbled effect.
Picture This:
Picture a marbled clay pot in shades of soft pink, white, and gold, sitting on your coffee table. The swirling patterns look like a tiny work of art, and the glossy finish makes it feel luxurious. Your DIY clay flower pot is a little slice of elegance.
8. Hanging Clay Planters
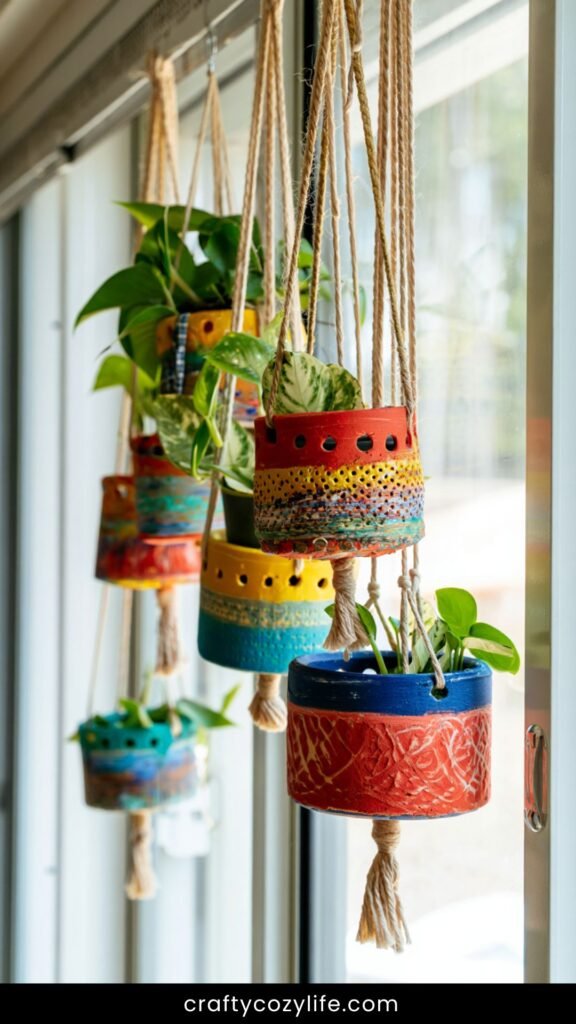
Why not take your plants to new heights with these adorable hanging planters?
Step-by-Step:
- Roll & Shape: Roll out your clay and shape it into a small bowl or cone.
- Add Holes: Use a straw or skewer to poke two holes near the rim for the hanging string.
- Decorate: Add texture or patterns before the clay dries.
- Dry & Paint: Let it dry, then paint in bright, cheerful colors.
- Hang It: Thread twine or macramé cord through the holes and hang your planter near a sunny window.
Picture This:
Imagine a row of hanging clay planters in your kitchen window, each one painted in vibrant colors and holding a trailing pothos plant. The sunlight filters through the leaves, casting dappled shadows on the walls. Your DIY clay flower pots are bringing life and color to every corner.
9. Animal-Shaped Pots
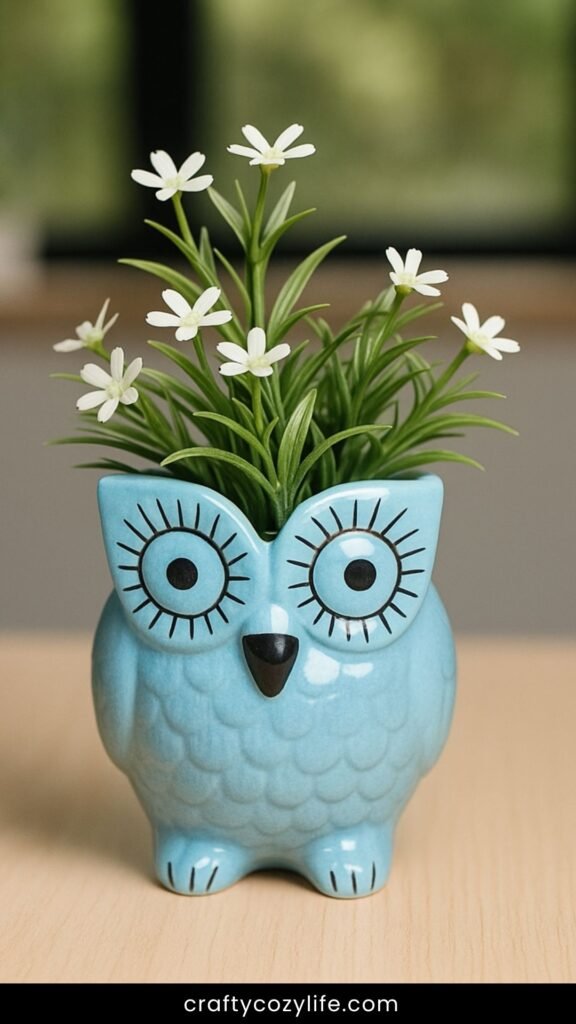
These are perfect for adding a playful touch to your space or as gifts for kids.
Step-by-Step:
- Roll & Shape: Roll out your clay and shape it into an animal head or body (like a cat, owl, or bunny).
- Add Details: Use small tools to carve eyes, ears, and other features.
- Hollow It Out: Make sure to leave an opening at the top for the plant.
- Dry & Paint: Let it dry, then paint with bright, fun colors.
- Seal It: Finish with a clear sealant to protect your design.
Picture This:
Picture a shelf filled with animal-shaped clay pots—a smiling bunny, a wise owl, and a curious cat. Each one is bursting with personality, and the tiny plants sprouting from their heads make them even more adorable. Your DIY clay flower pots are pure joy in 3D form.
10. Boho Beaded Pots
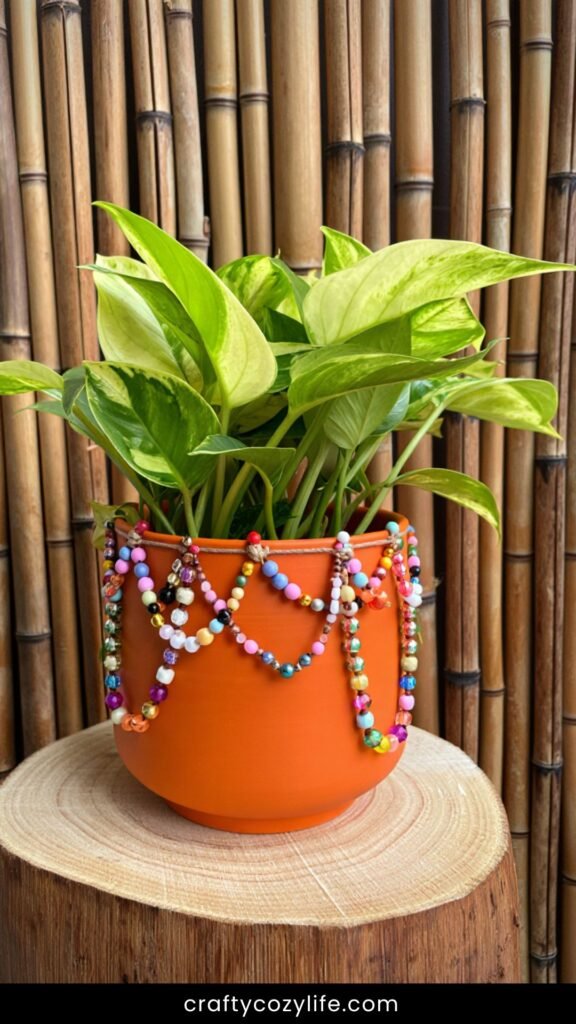
Add some boho flair to your pots with colorful beads and patterns.
Step-by-Step:
- Roll & Assemble: Create your pot as usual, but leave the surface smooth.
- Add Beads: Press small beads into the clay before it dries to create patterns or borders.
- Dry & Paint: Let it dry, then paint around the beads for a pop of color.
- Seal It: Finish with a clear sealant to secure the beads.
Picture This:
Imagine a boho-inspired clay pot with turquoise beads pressed into the rim, sitting on a woven mat beside your favorite chair. The beads catch the light, and the earthy tones of the pot blend perfectly with your cozy decor. Your DIY clay flower pot is a boho dream come true.
11. Rainbow Striped Pots
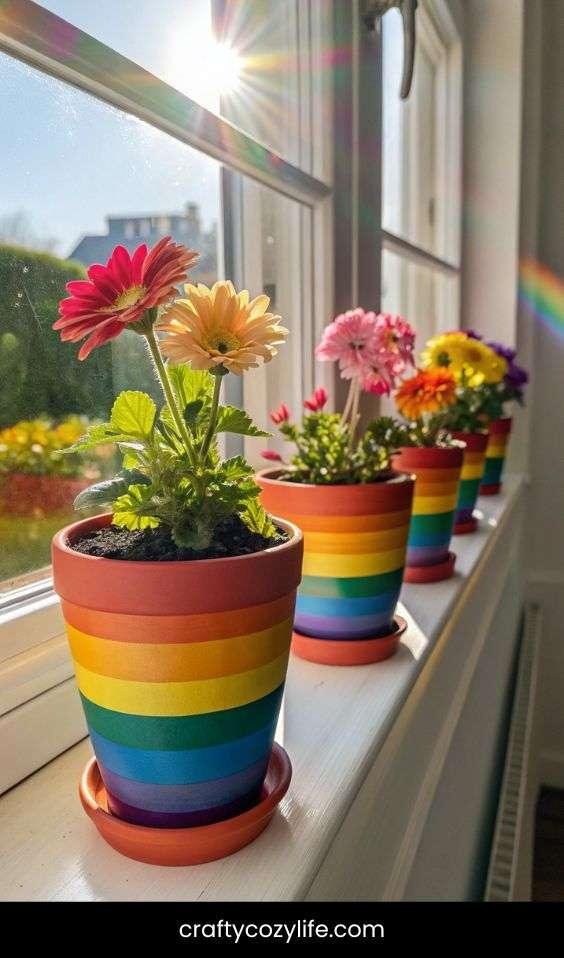
Bring a burst of color to your space with these cheerful rainbow pots.
Step-by-Step:
- Roll & Assemble: Create your pot as usual, keeping the surface smooth.
- Paint Stripes: Use painter’s tape to mark off stripes, then paint each section in a different color of the rainbow.
- Remove Tape: Carefully peel off the tape to reveal crisp, clean stripes.
- Seal It: Finish with a clear sealant to protect your colorful design.
Picture This:
Picture a windowsill filled with rainbow-striped clay pots, each one bursting with color. The sunlight streams through, making the colors glow like a tiny rainbow in your home. Your DIY clay flower pots are a daily dose of happiness.
12. Gold-Accented Pots
A little gold goes a long way in making your pots feel luxurious.
Step-by-Step:
- Roll & Assemble: Create your pot as usual, keeping the surface smooth.
- Paint Base: Paint the pot in a neutral color like white, black, or gray.
- Add Gold: Use gold paint or leaf to accent the rim, handles, or patterns.
- Seal It: Finish with a clear sealant to protect the gold accents.
Picture This:
Imagine a gold-accented clay pot on your dining table, holding a lush fern. The gold details catch the candlelight, adding a touch of glamour to your space. Your DIY clay flower pot is the perfect blend of rustic and refined.
13. Seasonal Theme Pots
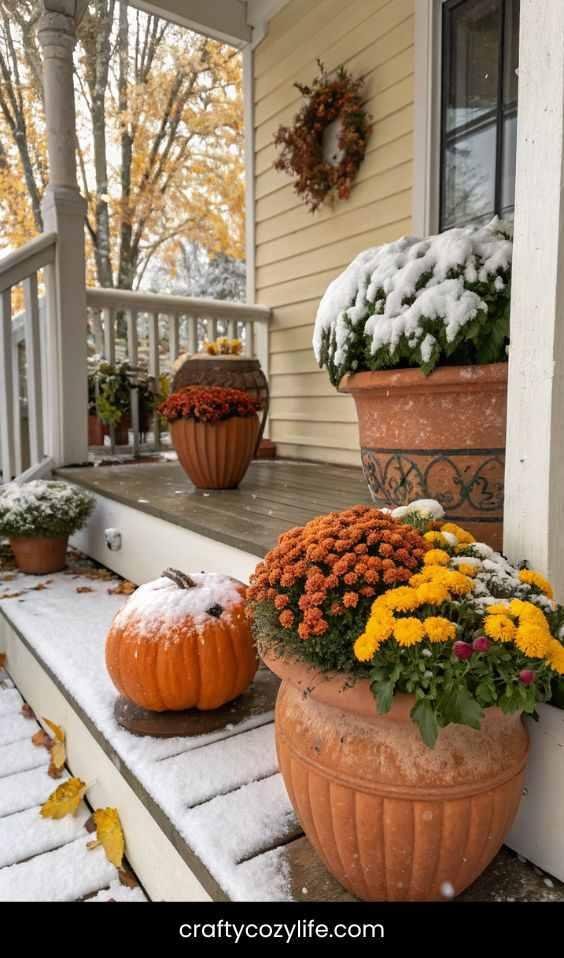
Celebrate the seasons with themed pots that change with the time of year.
Step-by-Step:
- Roll & Assemble: Create your pot as usual.
- Decorate: Use seasonal motifs like pumpkins for fall, snowflakes for winter, or flowers for spring.
- Paint & Seal: Paint in seasonal colors and seal with varnish.
Picture This:
Picture a set of seasonal clay pots on your porch—a pumpkin-themed pot in fall, a snow-dusted one in winter, and a floral one in spring. Each one reflects the beauty of the season, making your space feel fresh and festive year-round.
14. Mosaic-Inspired Pots
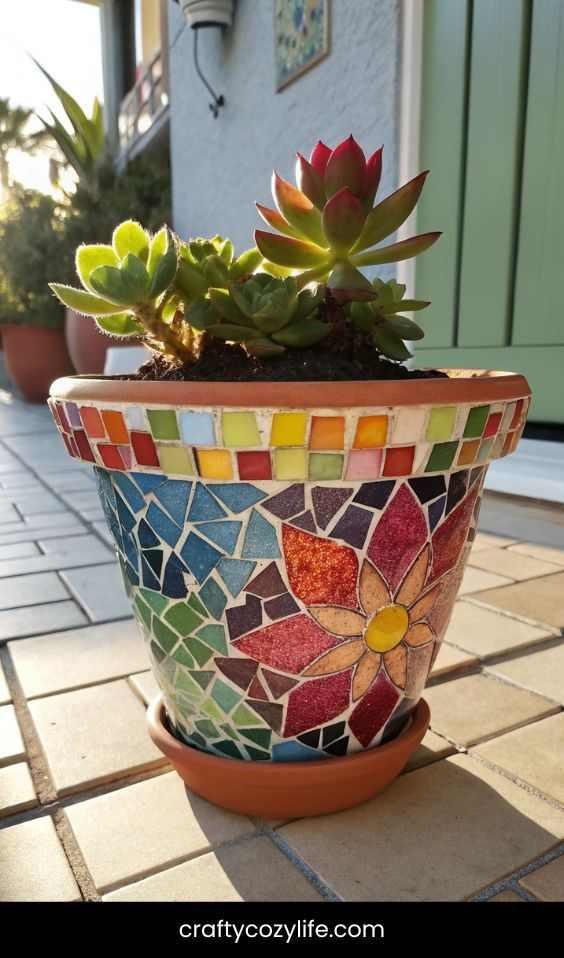
Create a mosaic effect using small pieces of colored clay.
Step-by-Step:
- Roll & Cut: Roll out different colors of clay and cut them into small pieces.
- Assemble: Press the pieces onto a base pot, leaving small gaps between them.
- Smooth & Dry: Smooth the surface and let it dry.
- Seal It: Finish with a glossy sealant to mimic the look of real mosaic tiles.
Picture This:
Imagine a mosaic-inspired clay pot on your patio, its surface a kaleidoscope of colors. The glossy finish makes it look like a piece of art, and the sunlight makes the colors sparkle. Your DIY clay flower pot is a masterpiece in miniature.
15. Stackable Mini Pots
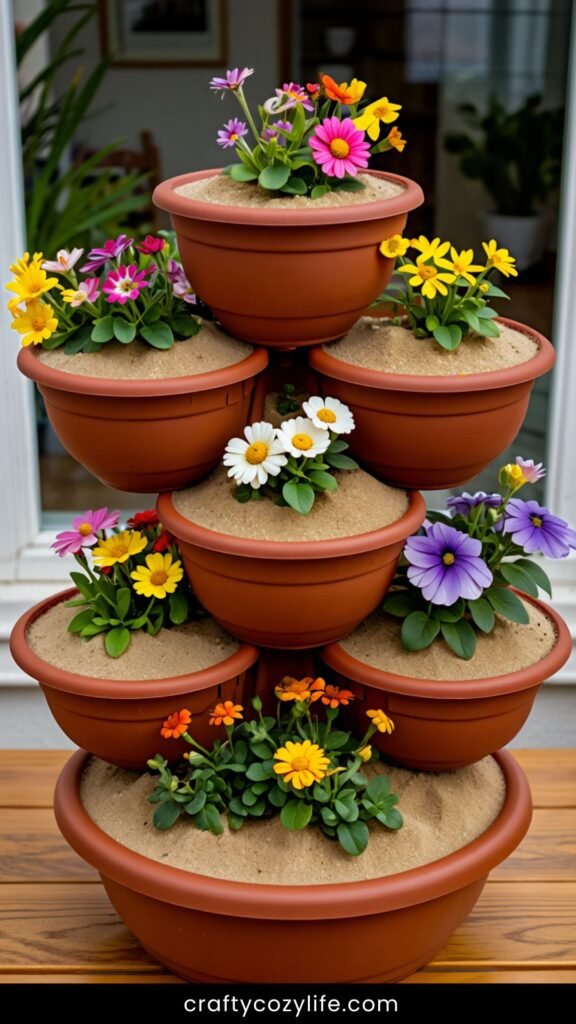
These tiny stackable pots are perfect for succulents or herbs.
Step-by-Step:
- Roll & Shape: Roll out your clay and shape it into small, stackable pots.
- Add Grooves: Carve small grooves into the rims so they can stack securely.
- Dry & Paint: Let them dry, then paint in coordinating colors.
- Seal It: Finish with a clear sealant.
Picture This:
Picture a tower of stackable clay pots on your kitchen counter, each one holding a tiny herb or succulent. The vibrant colors and playful design make it a focal point in your space. Your DIY clay flower pots are as functional as they are cute.
Closing Thoughts
Whew! That’s 15 amazing DIY clay flower pot crafts to keep your creative juices flowing. Whether you’re making a marbled masterpiece, a whimsical animal pot, or a sleek geometric planter, each project is a chance to express yourself and add a little handmade charm to your space.
So, what’s next on your crafting agenda? Whatever it is, I hope these ideas inspire you to grab some clay, get your hands dirty, and create something beautiful. Remember, the best part of DIY is making it your own—so don’t be afraid to experiment and have fun!