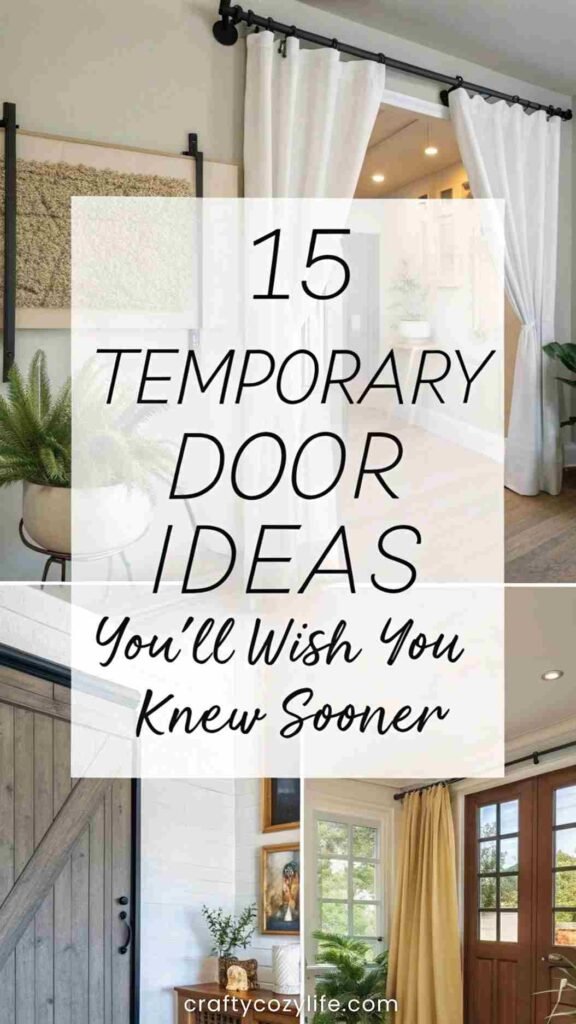
15 Temporary Door Ideas You’ll Wish You Knew Sooner
Let’s talk about something that’s both practical and fun—temporary door ideas.
Whether you’re renting, redecorating, or just need a quick fix, temporary doors can be a game-changer. They’re perfect for adding privacy, dividing spaces, or just sprucing up your home without the commitment of permanent changes. Plus, they’re a fantastic way to flex your creative muscles!
So, grab your coffee, and let’s dive into some totally doable temporary door ideas.
What You Might Need:
- Tension rods
- Curtains or fabric panels
- Command hooks or adhesive strips
- Beaded curtains or macramé hangings
- Room dividers or folding screens
- Plywood or lightweight wood panels
- Paint, wallpaper, or decorative contact paper
- Scissors, measuring tape, and a drill (if needed)
- Your favorite playlist (because crafting is better with tunes!)
1. Curtain Doors: Soft, Stylish, and Super Easy
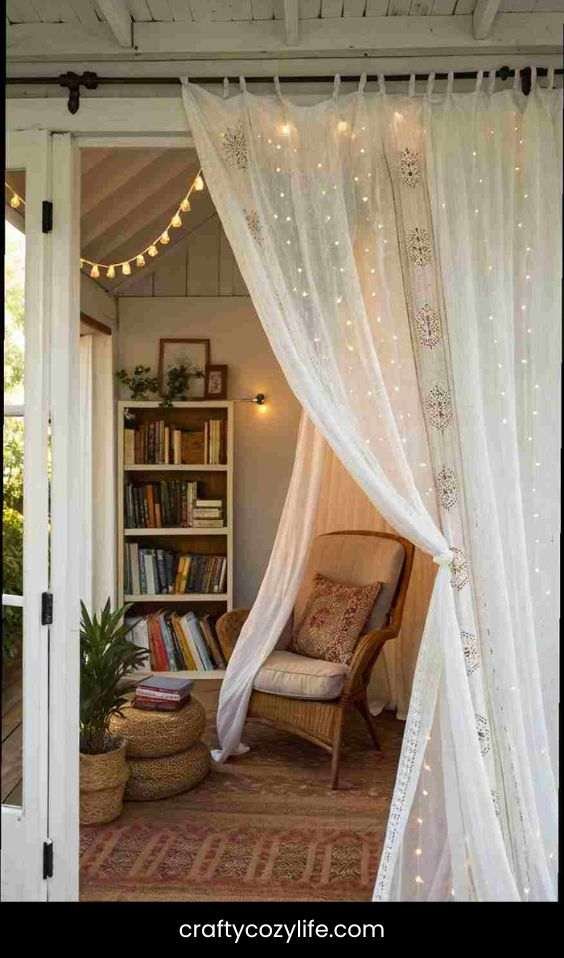
Curtains aren’t just for windows. They make fantastic temporary doors, especially for closets, room dividers, or even bathrooms.
Step-by-Step:
- Measure the Space: Use a measuring tape to determine the width and height of the doorway or opening.
- Choose Your Curtains: Pick a fabric that matches your vibe—light and airy for a breezy feel, or thick and textured for more privacy.
- Install a Tension Rod: Place a tension rod at the top of the doorway. Adjust it until it’s snug and secure.
- Hang the Curtains: Drape your curtains over the rod, and voilà! You’ve got a soft, stylish door alternative.
Picture This: A flowing white curtain gently swaying in the breeze, creating a dreamy, bohemian entrance to your reading nook. It’s like stepping into your own little sanctuary.
2. Beaded Curtains: Retro Vibes, Modern Twist
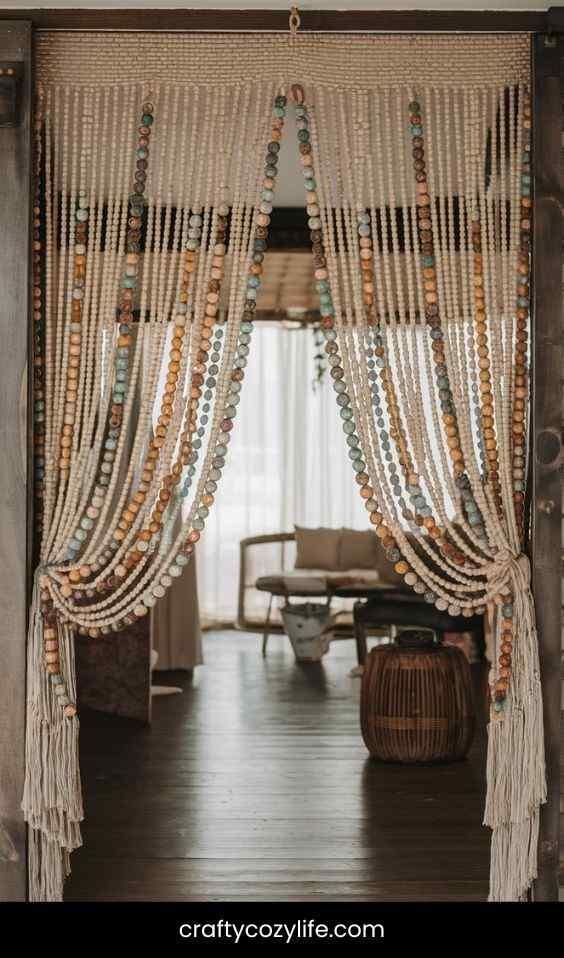
Beaded curtains are making a comeback, and for good reason. They’re fun, functional, and add a touch of whimsy to any space.
Step-by-Step:
- Measure the Doorway: Get the width and height of the space where you want to hang the beads.
- Choose Your Beads: Go for classic wooden beads, colorful acrylics, or even macramé for a boho feel.
- Install a Curtain Rod: Use a tension rod or adhesive hooks to hang the beaded curtain.
- Hang and Adjust: Drape the beads over the rod and adjust the length if needed.
Picture This: A cascade of wooden beads clicking softly as you walk through, creating a cozy, retro vibe that feels like a hug from the ‘70s.
3. Folding Screens: Portable and Versatile

Folding screens are the ultimate temporary door solution. They’re portable, stylish, and can be moved around as needed.
Step-by-Step:
- Choose a Screen: Pick a folding screen that matches your decor—think bamboo for a natural look or painted panels for a pop of color.
- Position It: Place the screen in front of the doorway or opening. Adjust the panels to cover the space completely.
- Secure It (Optional): If you’re worried about stability, use small adhesive hooks to keep the screen in place.
Picture This: A beautifully painted folding screen standing tall, transforming your living room into a private, cozy retreat. It’s like having a secret door to your own little world.
4. DIY Plywood Door: Custom and Creative
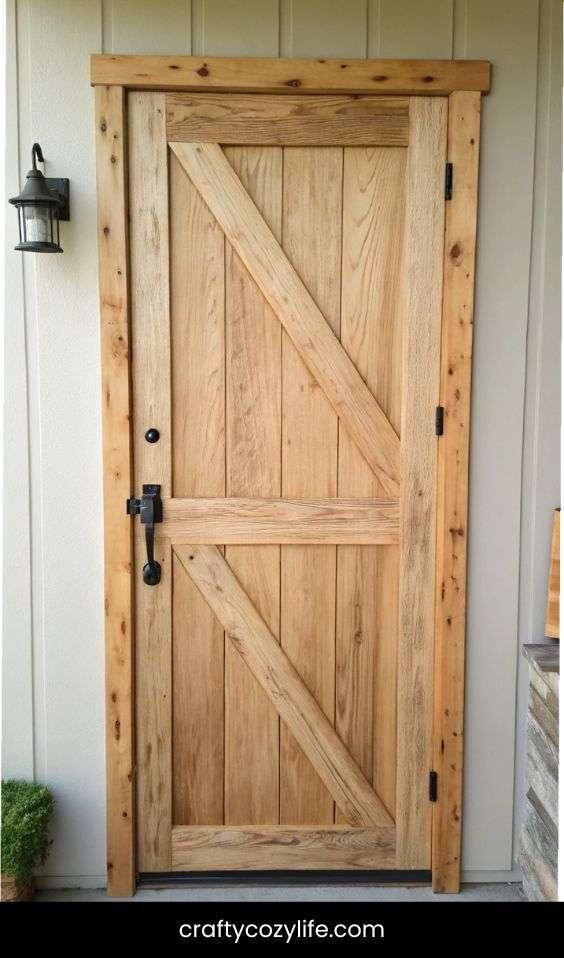
If you’re feeling a little crafty, a DIY plywood door is a fantastic option. It’s lightweight, customizable, and totally unique.
Step-by-Step:
- Measure and Cut: Measure the doorway and cut a plywood panel to fit. Sand the edges to avoid splinters.
- Decorate: Paint, stencil, or use wallpaper to personalize your door. Add handles or knobs for a finished look.
- Install: Use hinges to attach the door to the doorway.
Picture This: A rustic plywood door painted with a whimsical design, adding a touch of charm and personality to your space. It’s like a piece of art that doubles as a door!
5. Paper Accordion Door: Lightweight and Artistic
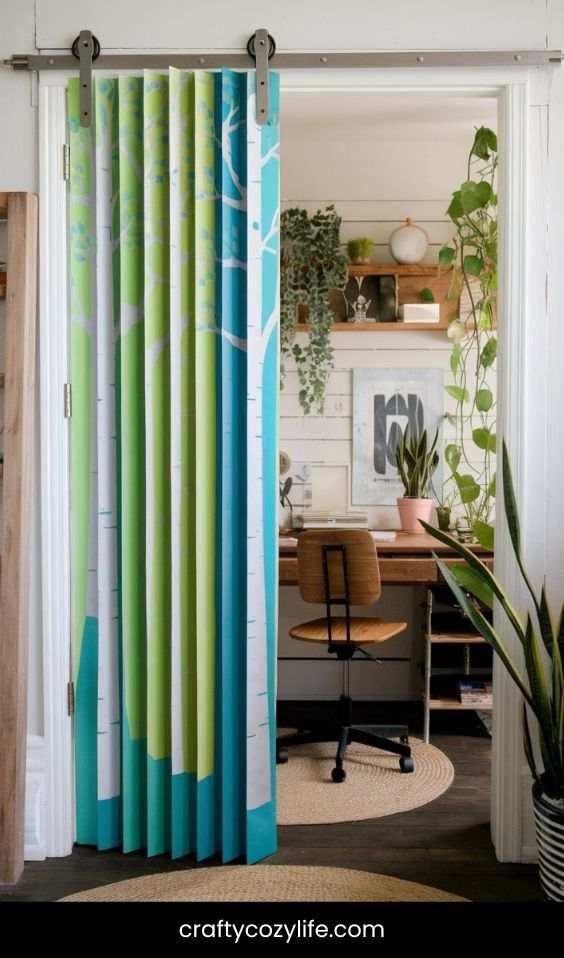
Paper accordion doors are lightweight, easy to install, and perfect for adding a pop of color or pattern.
Step-by-Step:
- Choose a Paper Door: Look for pre-made paper accordion doors or make your own using sturdy paper and adhesive.
- Install: Use adhesive strips or a tension rod to hang the door in the doorway.
- Customize: Paint or decorate the paper to match your style.
Picture This: A brightly colored paper accordion door folding open to reveal your workspace, adding a playful and artistic touch to your room. It’s like a pop-up book come to life.
6. Bookcase Door: Secret Passage Vibes
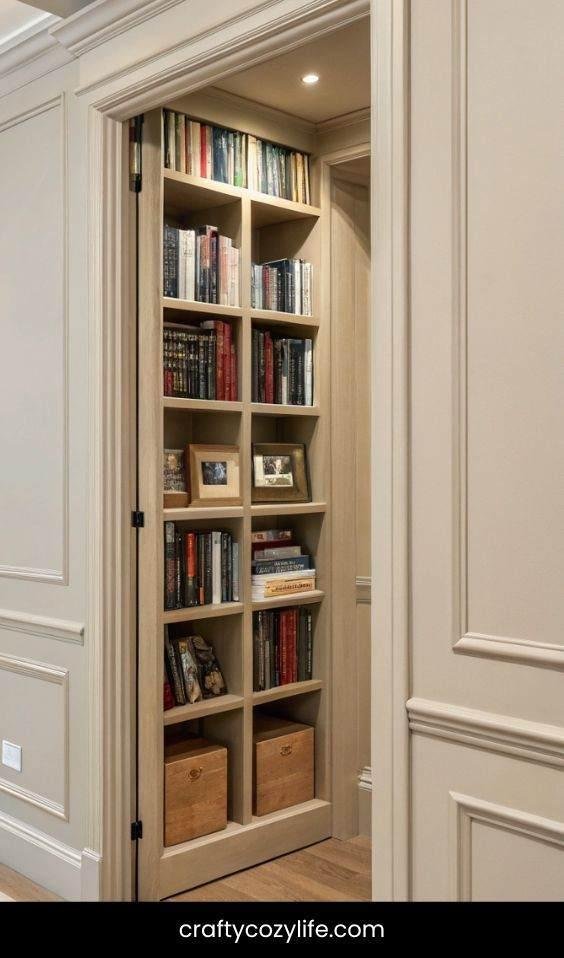
Why not turn your temporary door into a secret passage? A bookcase door is both functional and fun.
Step-by-Step:
- Choose a Bookcase: Pick a lightweight bookcase that fits the doorway.
- Fill It Up: Add books, plants, or decorative items to the shelves.
- Position It: Place the bookcase in front of the doorway, ensuring it’s stable and secure.
Picture This: A bookcase filled with your favorite reads and trinkets, hiding a secret doorway to your cozy reading nook. It’s like something out of a fairy tale!
7. Shoji Screen Doors: Zen and Serene
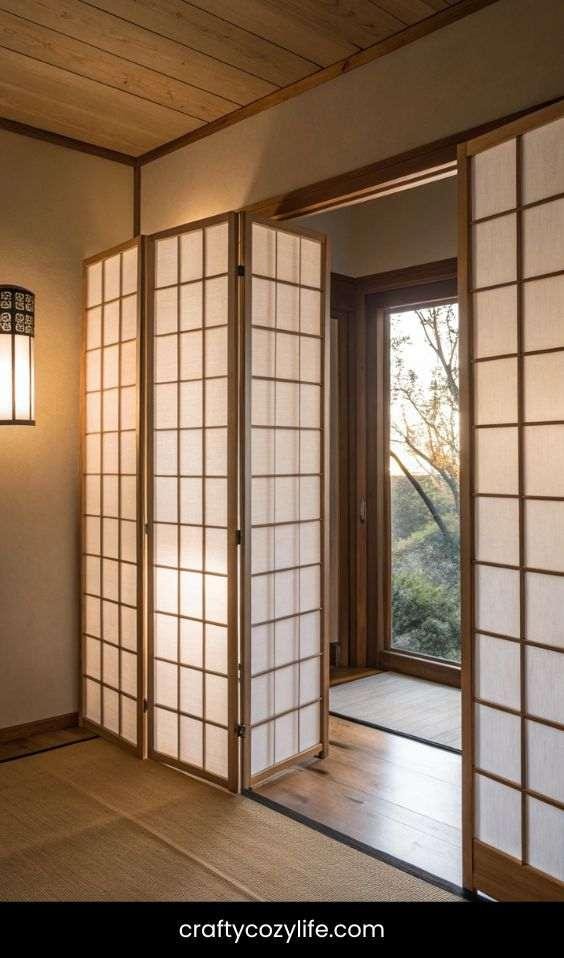
Shoji screens are lightweight, elegant, and perfect for creating a calming, minimalist vibe.
Step-by-Step:
- Find a Shoji Screen: Look for a folding shoji screen or a single panel that fits your doorway.
- Position It: Place the screen in front of the doorway, ensuring it covers the space completely.
- Secure It: Use adhesive strips or small brackets to keep it in place if needed.
Picture This: A delicate shoji screen filtering soft, diffused light into your space, creating a tranquil, zen-like atmosphere. It’s like bringing a piece of a Japanese garden into your home.
8. Pallet Wood Door: Rustic and Charming
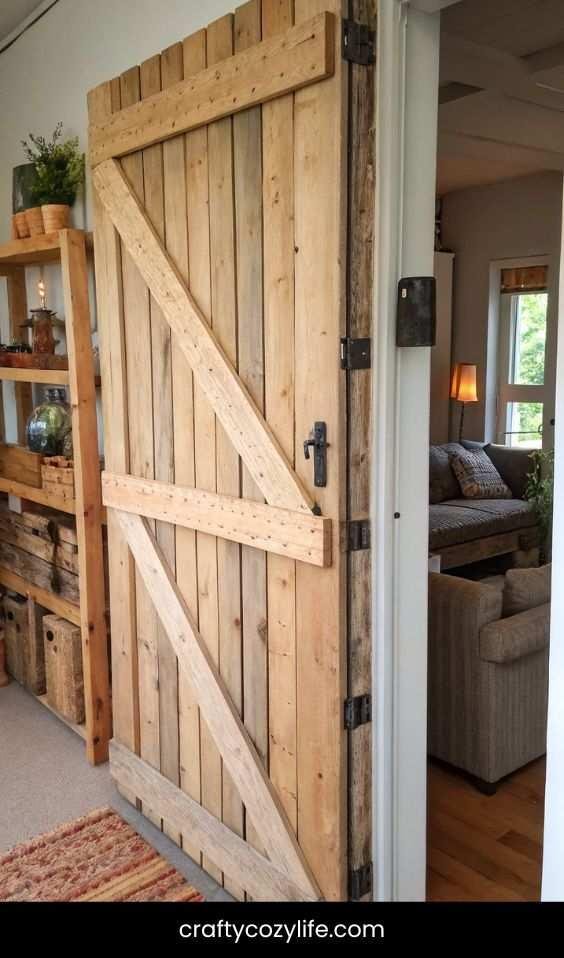
Upcycle wooden pallets into a charming, rustic temporary door. It’s eco-friendly and full of character!
Step-by-Step:
- Source a Pallet: Find a clean, sturdy pallet and disassemble it carefully.
- Sand and Paint: Sand the wood to remove splinters and paint or stain it to match your decor.
- Assemble the Door: Nail or screw the pallet planks together to create a door-sized panel.
- Install: Use hinges to attach it to the doorway.
Picture This: A weathered pallet wood door with a fresh coat of white paint, adding a touch of farmhouse charm to your space. It’s like a cozy cottage right in your own home.
9. Magnetic Screen Door: Practical and Modern
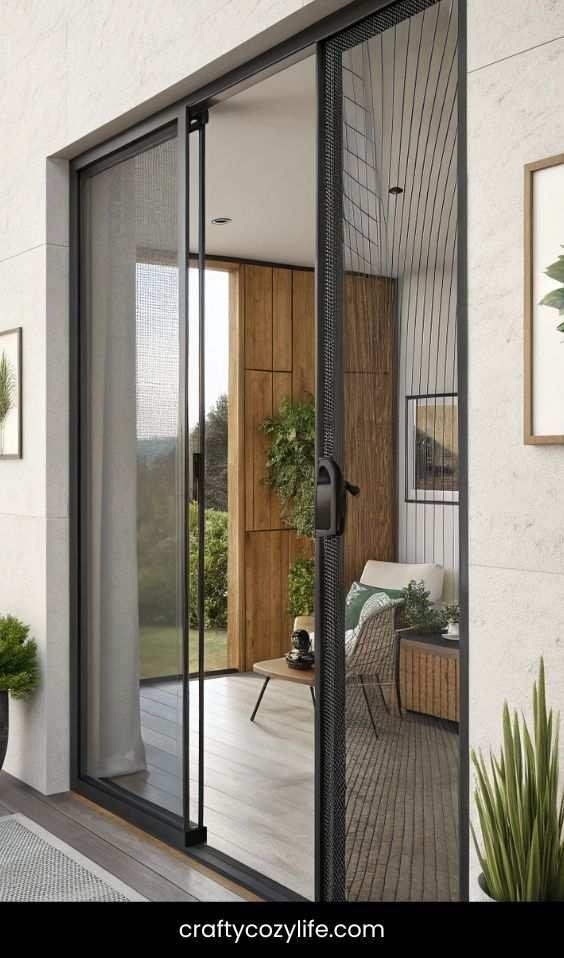
Perfect for keeping bugs out while letting fresh air in, a magnetic screen door is a great temporary solution for patios or balconies.
Step-by-Step:
- Measure the Doorway: Ensure the screen door fits the width and height of your opening.
- Install the Frame: Use adhesive strips or Velcro to attach the frame to the doorway.
- Attach the Screen: Hang the magnetic screen and test it to make sure it seals properly.
Picture This: A sleek magnetic screen door gently closing behind you as you step outside to enjoy the fresh air. It’s like bringing the outdoors in without the bugs!
10. Macramé Door Hanging: Boho and Beautiful
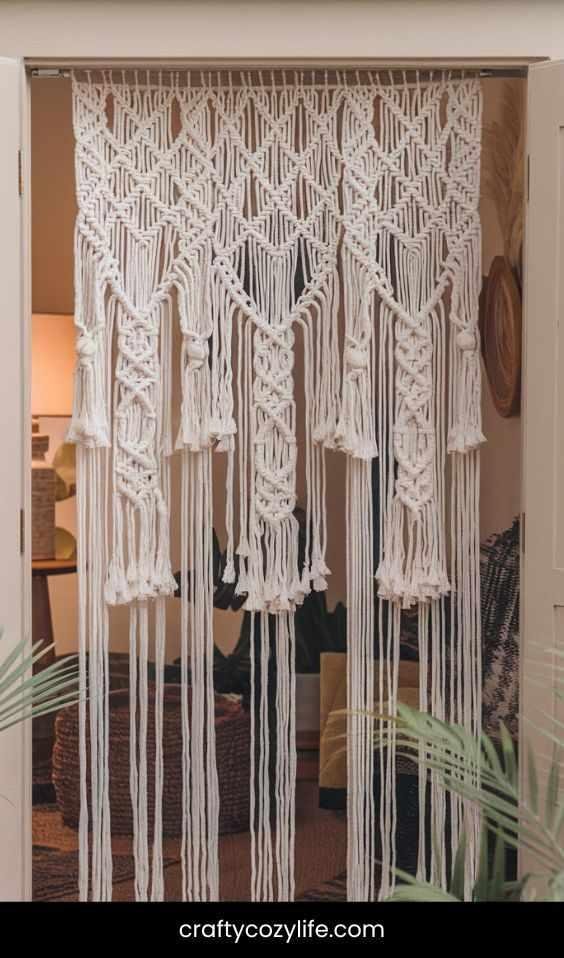
Macramé isn’t just for wall art—it can also make a stunning temporary door covering.
Step-by-Step:
- Choose a Macramé Piece: Find a large macramé wall hanging or make your own if you’re feeling crafty.
- Hang It Up: Use a tension rod or adhesive hooks to hang the macramé over the doorway.
- Adjust the Length: Trim or tie the ends to ensure it fits perfectly.
Picture This: A cascading macramé piece with intricate knots and tassels, adding a boho-chic vibe to your doorway. It’s like a piece of art you can walk through.
11. Barn Door Slider: Farmhouse Flair
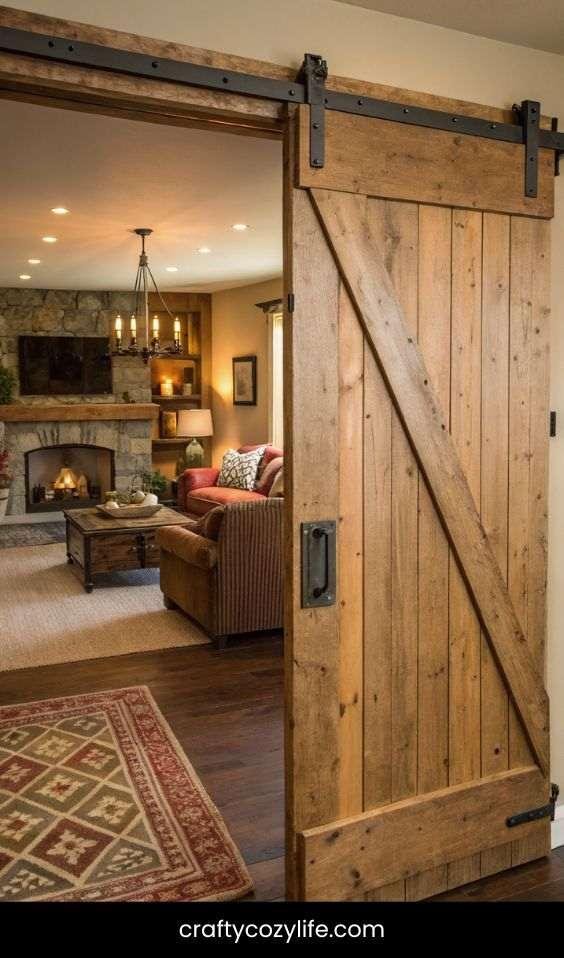
A sliding barn door is a stylish and functional temporary solution, especially for larger openings.
Step-by-Step:
- Find a Barn Door Kit: Look for a lightweight, temporary barn door kit.
- Install the Track: Attach the track above the doorway using adhesive strips or brackets.
- Hang the Door: Slide the door onto the track and adjust it for smooth movement.
Picture This: A rustic barn door sliding open to reveal your cozy living room, complete with a plush rug and flickering candles. It’s like stepping into a farmhouse dream.
12. Hanging Plant Door: Green and Gorgeous
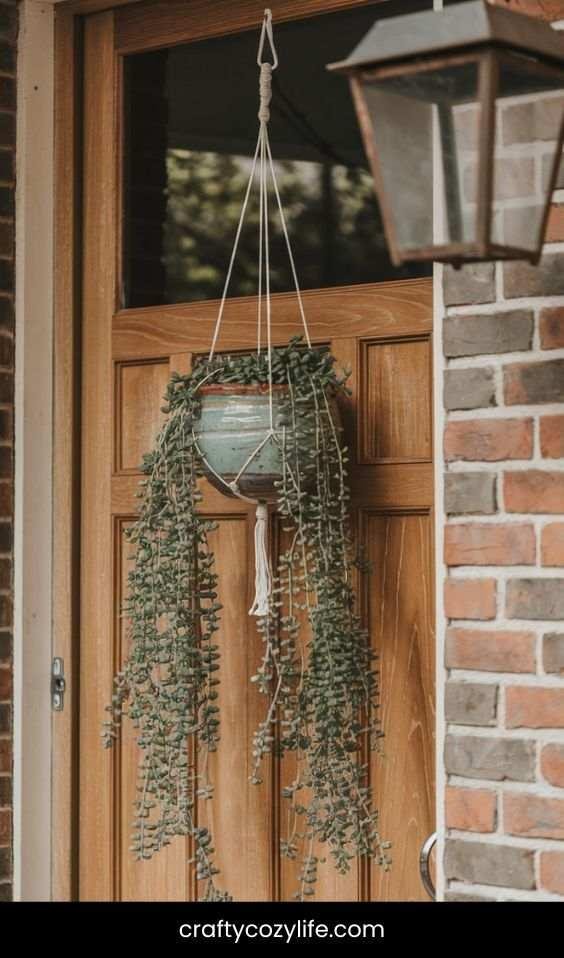
Turn your doorway into a lush, green oasis with a hanging plant curtain.
Step-by-Step:
- Choose Your Plants: Pick lightweight, trailing plants like pothos, ivy, or string of pearls.
- Hang the Planters: Use adhesive hooks or a tension rod to hang small planters above the doorway.
- Arrange the Plants: Let the vines trail down to create a natural, living curtain.
Picture This: A cascade of green leaves framing your doorway, bringing a touch of nature indoors. It’s like walking through a secret garden every day.
13. Chalkboard Door: Fun and Functional
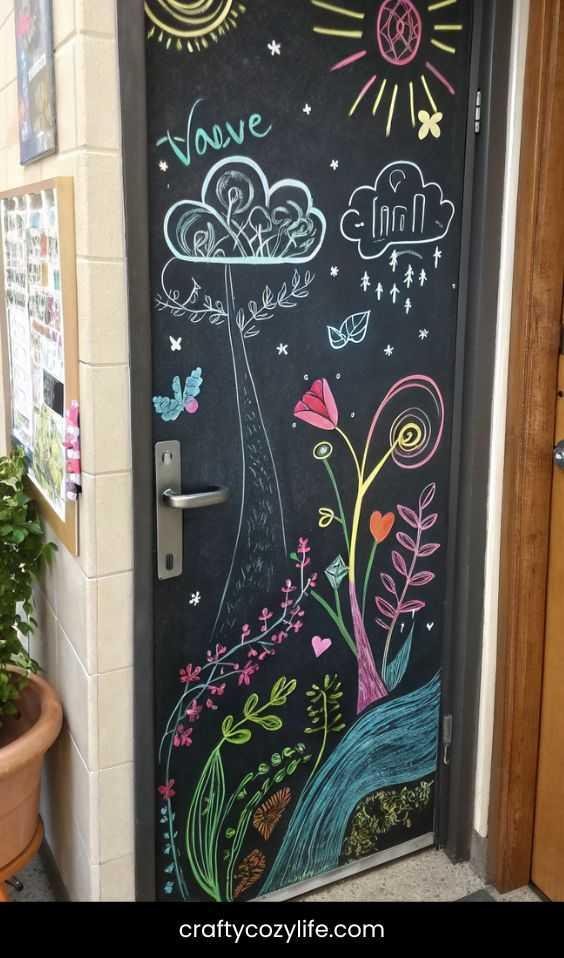
A chalkboard door is perfect for adding a playful, interactive element to your space.
Step-by-Step:
- Choose a Panel: Use a lightweight wood or MDF panel cut to fit your doorway.
- Paint It: Apply chalkboard paint and let it dry completely.
- Install: Use hinges or adhesive strips to attach the panel to the doorway.
Picture This: A chalkboard door covered in doodles, quotes, and reminders, adding a personal and creative touch to your space. It’s like having a canvas that changes with your mood.
14. Pegboard Door: Functional and Customizable
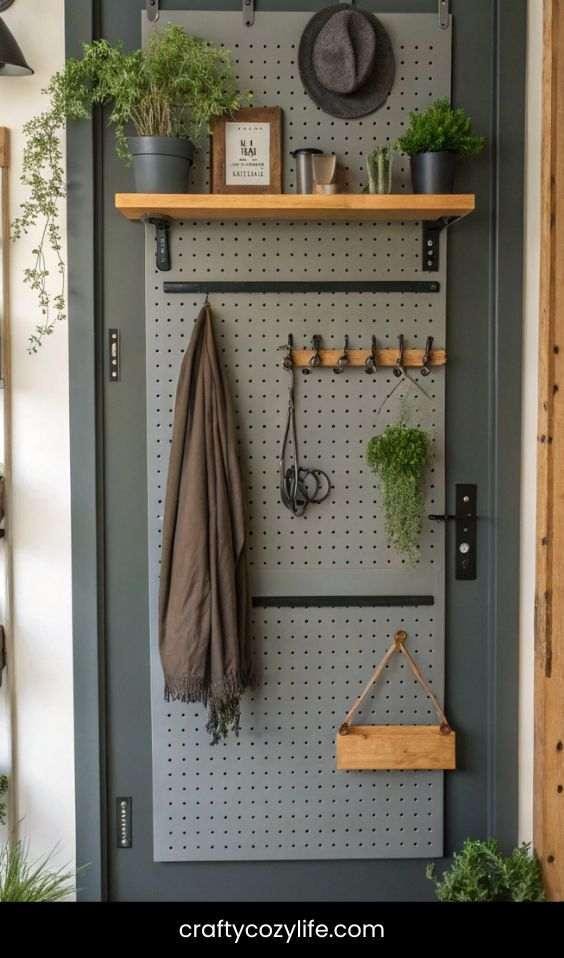
A pegboard door is perfect for adding storage and style.
Step-by-Step:
- Cut a Pegboard Panel: Measure and cut a pegboard to fit your doorway.
- Paint or Decorate: Customize the pegboard with paint or decorative elements.
- Install: Use hinges or adhesive strips to attach the pegboard to the doorway.
Picture This: A pegboard door filled with hooks, shelves, and small plants, combining functionality with a modern, industrial look.
15. Repurposed Shutter Door: Vintage and Versatile
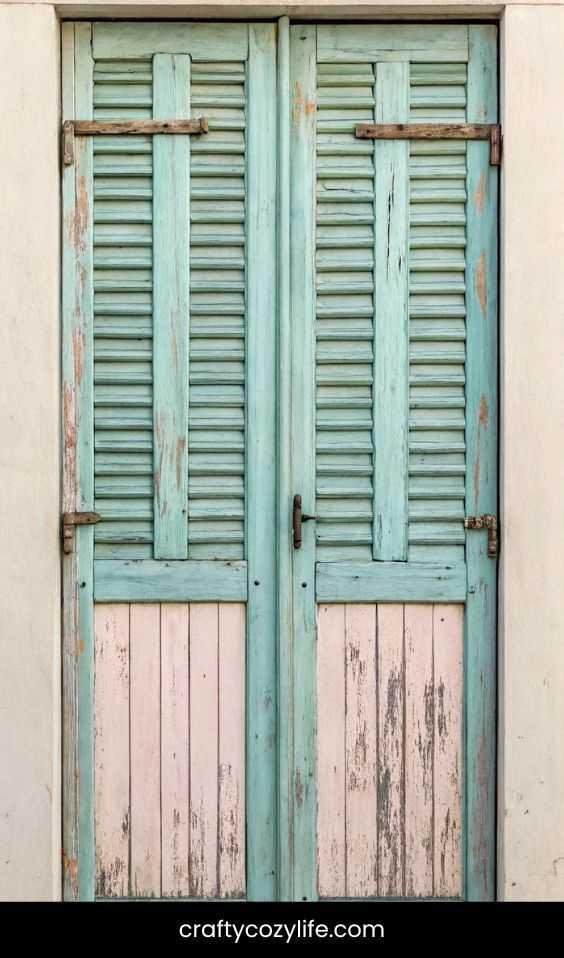
Old shutters make fantastic temporary doors, especially for adding a vintage touch.
Step-by-Step:
- Find Shutters: Look for old wooden shutters at thrift stores or flea markets.
- Clean and Paint: Sand and paint the shutters to match your decor.
- Install: Use hinges or adhesive strips to attach the shutters to the doorway.
Picture This: A pair of weathered shutters painted in a soft pastel hue, adding a touch of vintage charm to your space. It’s like a little piece of history in your home.
FAQs
1. Can I use these ideas in a rental home?
Absolutely! That’s the beauty of temporary door solutions—they’re perfect for renters. Most of these ideas use non-permanent materials like tension rods, adhesive strips, or freestanding screens, so you won’t damage walls or doorframes. Just double-check with your landlord if you’re unsure.
2. How do I choose the right temporary door for my space?
Think about your needs and style:
- Privacy: Go for solid options like curtains, plywood, or folding screens.
- Aesthetics: Choose something decorative like beaded curtains, macramé, or fabric panels.
- Functionality: If you need something lightweight and easy to move, try tension rods or accordion doors.
- Vibe: Match the door to your decor—boho, rustic, modern, or minimalist.
3. Are these ideas budget-friendly?
Totally! Most of these ideas use affordable materials like fabric, plywood, or secondhand finds (like shutters or pallets). You can even repurpose items you already have at home. The goal is to get creative without breaking the bank.
4. How do I make sure my temporary door stays in place?
It depends on the idea:
- Tension rods: Perfect for lightweight options like curtains or beaded curtains.
- Adhesive strips or hooks: Great for hanging fabric panels, macramé, or lightweight screens.
- Freestanding options: Folding screens or bookcase doors don’t need installation—just place them where you want them.
- Hinges or brackets: For sturdier options like plywood or shutter doors, use removable hardware.
5. Can I customize these temporary doors?
Yes, and you absolutely should! Personalization is key to making your space feel like you. Paint, stencil, or decorate your doors with wallpaper, fabric, or even washi tape. Add handles, knobs, or tassels for extra flair.
Closing Thoughts
We’ve made it to the end of our discussion about temporary door ideas, and I hope you’re feeling as inspired as I am! Whether you’re dreaming of a boho macramé masterpiece, a rustic pallet wood door, or a sleek magnetic screen, the possibilities are endless. The best part? These ideas are all about you—your style, your needs, and your creativity.
Temporary doors aren’t just practical solutions; they’re opportunities to tell your story. Maybe that story is a chalkboard door covered in quotes. Maybe it’s a lush, green plant curtain that brings the outdoors in. Or maybe it’s a flowing sheer fabric panel that feels like a soft whisper every time you walk through it. Whatever you choose, it’s a reflection of you.
So, let’s get started. Don’t stress about perfection—this is about having fun and making your space feel like home. And when you’re done, step back and admire your handiwork. You did that!
Oh, and don’t forget to share your creations on Pinterest. Tag me so I can cheer you on and maybe borrow a few ideas for my own space. Until next time, happy decorating! May your doors be stylish and your home be filled with all the good vibes.