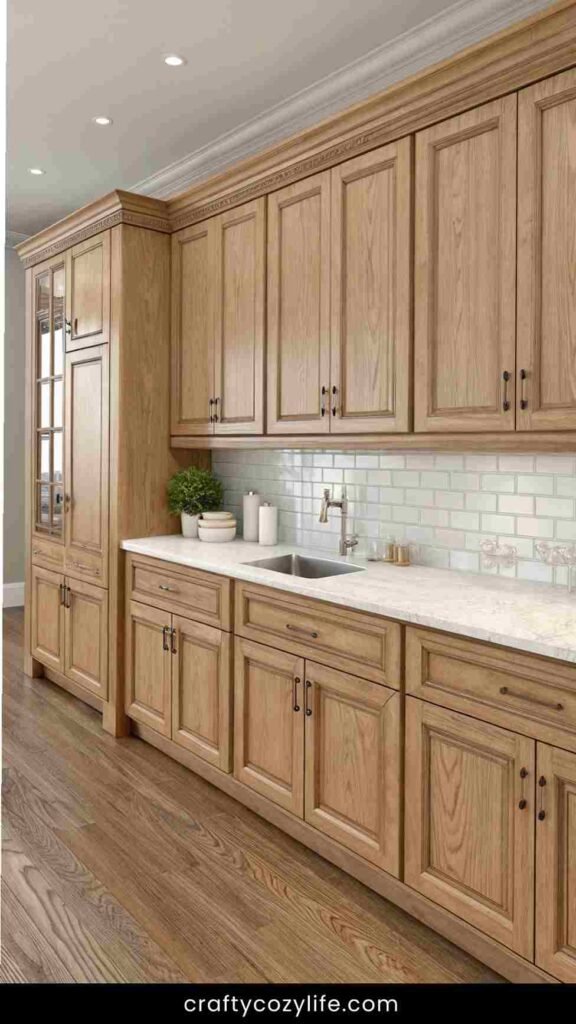
14 White Washed Oak Cabinets for a Timeless Look
If you’ve been dreaming of a kitchen that feels light, airy, and effortlessly charming, then whitewashed oak cabinets might just be your new obsession. There’s something about that soft, faded wood grain that whispers, “I’m timeless and relaxed”—like a rustic farmhouse met a coastal cottage and created the perfect love child.
But the best part? You don’t have to spend a fortune to get this dreamy look! With a little DIY magic (and a few simple materials), you can transform your existing cabinets into the whitewashed beauties of your Pinterest dreams.
What You Might Need:
- Sandpaper (medium and fine grit)
- Wood cleaner or degreaser
- Whitewash stain or a mix of white paint and water
- Paintbrush or rag
- Clear matte sealant
- Gloves and drop cloths
- Soft cloth for buffing
Let’s dive in and create a kitchen that looks like it belongs in a sun-soaked, magazine-worthy space!
1. Prepping Your Oak Cabinets for Whitewashing
Before we get to the fun part (aka, the whitewashing!), let’s set the stage. Prepping is key to making sure your finish looks smooth and lasts for years.
Step-by-Step:
- Remove Cabinet Doors & Hardware: Take off all doors and drawers, and remove handles, knobs, or hinges. This makes painting easier and prevents drips.
- Clean Thoroughly: Use a wood cleaner or degreaser to remove any built-up grease, grime, or residue.
- Sand It Down: Use medium-grit sandpaper first to strip off any existing finish. Then, smooth it out with fine-grit sandpaper. Wipe away dust with a damp cloth.
Picture This:
Your cabinets are fresh, smooth, and prepped for their glow-up. The natural oak grain is peeking through, ready to soak up that gorgeous whitewashed finish. The kitchen already feels lighter—like a fresh canvas waiting for a masterpiece!
2. Creating the Perfect Whitewash Mixture
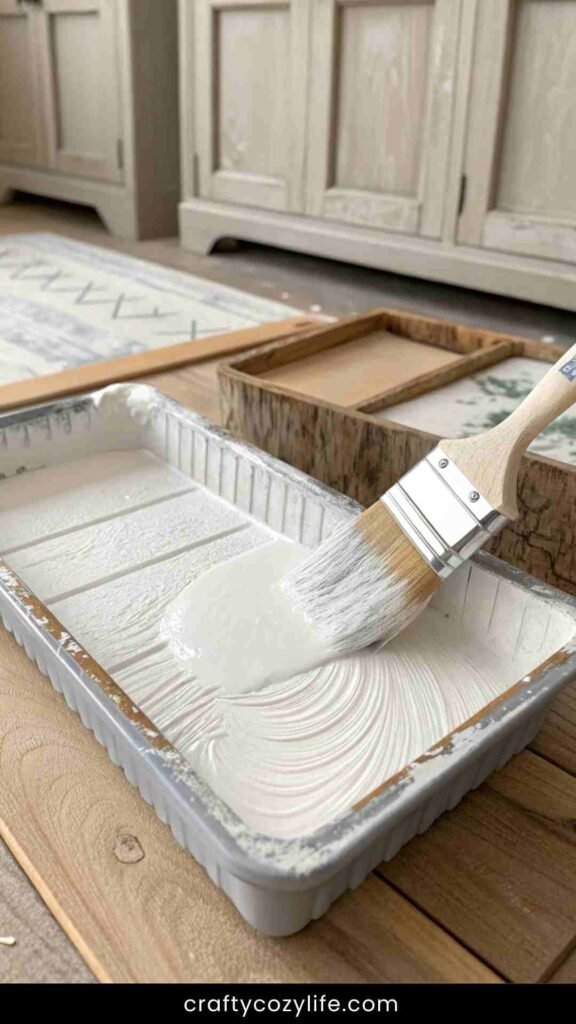
The key to a good whitewashed oak cabinet finish is getting the perfect consistency of your stain or paint mix. Too thick, and you’ll cover up the wood grain; too thin, and it won’t make enough of an impact.
Step-by-Step:
- If Using Whitewash Stain: Shake or stir well before using.
- If Mixing Your Own: Combine equal parts white paint and water (for a more subtle look, use a 2:1 ratio of water to paint).
- Test First: Always test on a scrap piece of wood or an inconspicuous cabinet side to ensure you love the effect.
Picture This:
Your mixture is smooth and dreamy, like a soft cloud in a paint tray. You swipe a test streak across a hidden spot, and the oak grain peeks through just enough—giving you that effortless, beachy, farmhouse vibe.
3. Applying the Whitewash to Oak Cabinets
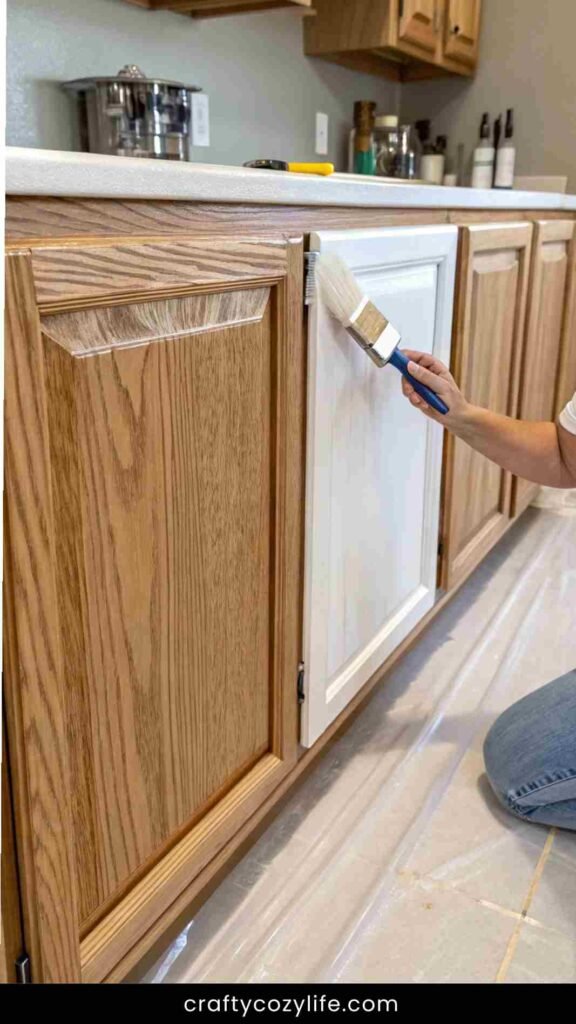
Now for the fun part! This is where the magic happens, as your cabinets start to transform before your eyes.
Step-by-Step:
- Use a Brush or Rag: Dip your brush or cloth into the whitewash and apply it in long, even strokes following the wood grain.
- Wipe Off Excess: After a few minutes, use a soft cloth to wipe off any excess. The longer you leave it on, the whiter the finish will be.
- Repeat for Desired Opacity: If you want a more pronounced whitewashed effect, apply a second coat after the first has dried.
- Let It Dry Completely: Patience, my friend! Let it dry for at least 24 hours before moving on.
Picture This:
With each stroke, your oak cabinets lighten and brighten. The grain peeks through just enough to give that charming rustic elegance. The kitchen feels airy, like a sun-drenched cottage on the coast, where morning coffee is always extra cozy.
4. Sealing Your Whitewashed Oak Cabinets
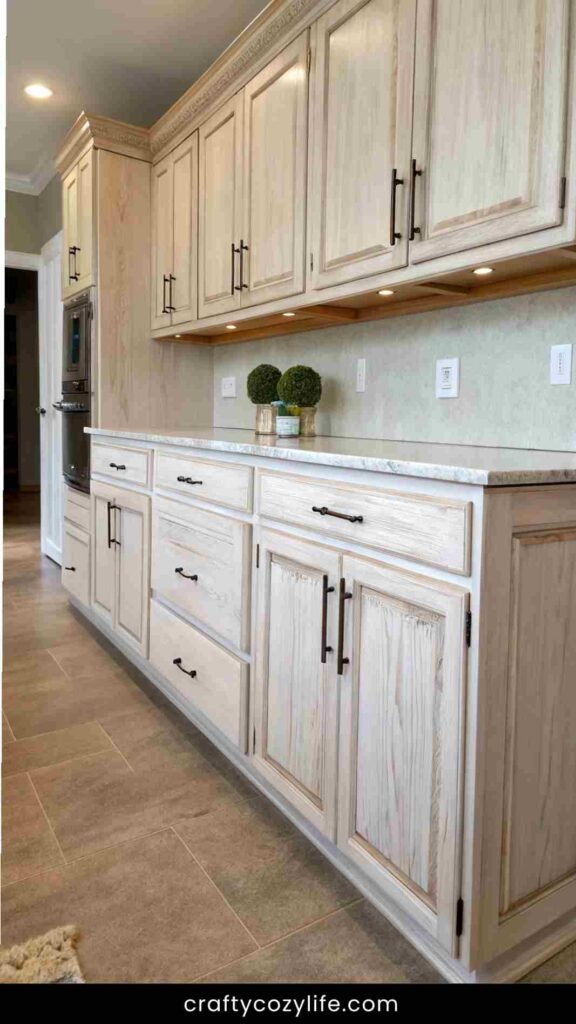
To keep your cabinets looking flawless for years to come, you’ll need to seal them properly.
Step-by-Step:
- Choose a Matte or Satin Sealant: A clear, non-yellowing finish will keep the whitewash looking fresh.
- Apply Thin Coats: Use a brush or sponge applicator to apply the sealant in smooth, even strokes.
- Let It Dry: Follow the product instructions and allow it to dry completely before reinstalling your cabinet doors.
Picture This:
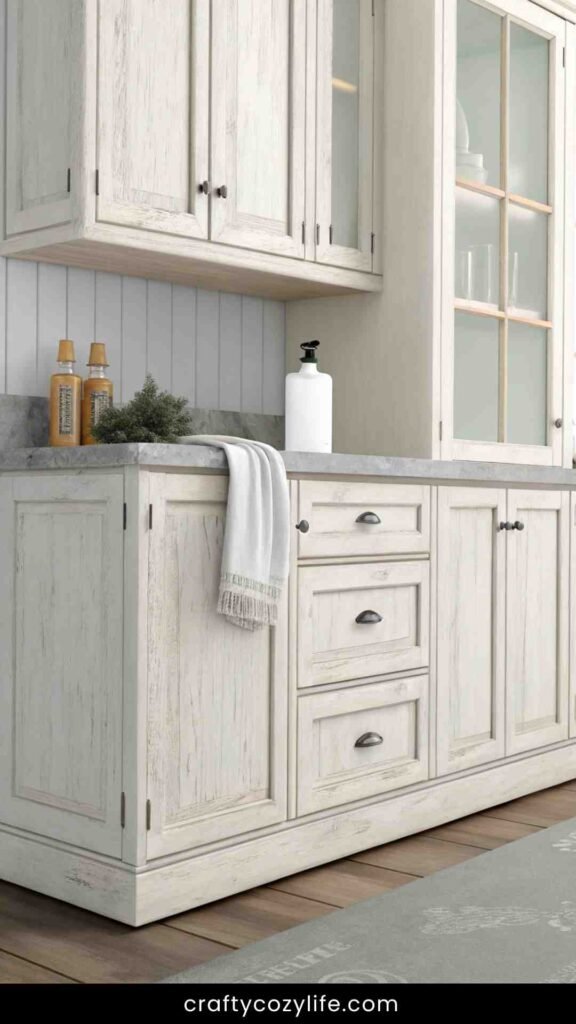
The final protective layer is on, and your cabinets now have a soft, glowing finish. They look like something straight out of a dreamy farmhouse kitchen Pinterest board—effortlessly elegant and oh-so-inviting.
5. Styling Your Whitewashed Oak Cabinets
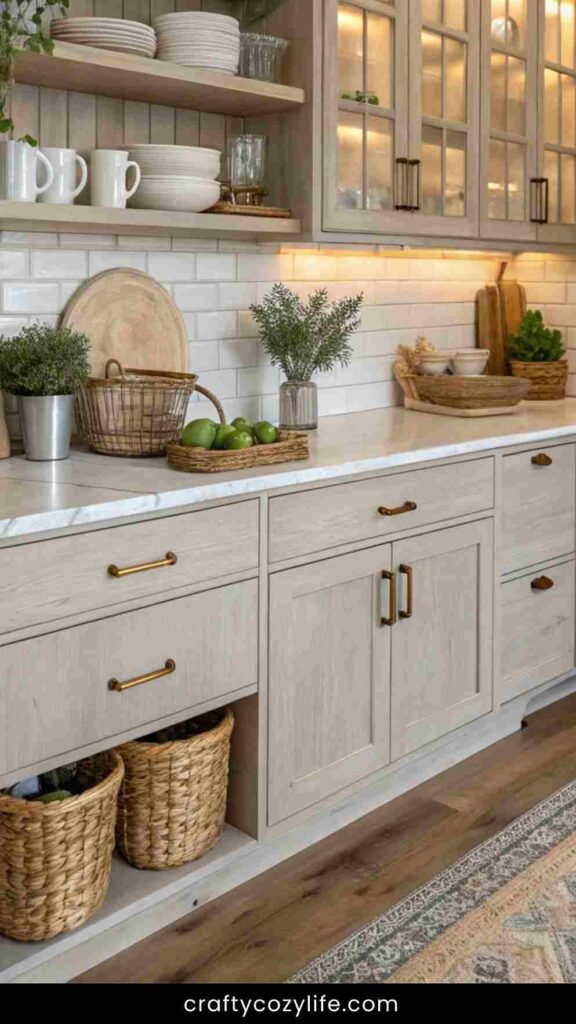
Now that your cabinets are beautifully whitewashed, it’s time to style them! The right accessories and decor can enhance that airy, rustic feel.
Step-by-Step:
- Add Open Shelving: If you have space, swap out a couple of cabinet doors for open shelving to show off pretty dishware.
- Choose Soft, Neutral Tones: White, beige, and muted pastels keep the space feeling light and serene.
- Incorporate Natural Elements: Woven baskets, wooden utensils, and fresh greenery pair perfectly with whitewashed wood.
- Upgrade Hardware: Swap out old knobs for brushed brass, black iron, or ceramic pulls to enhance the style.
- Use Warm Lighting: Soft under-cabinet lighting or warm-toned LED bulbs keep the kitchen feeling inviting.
Picture This:
Your kitchen now looks straight out of a home decor magazine. Open shelving displays your favorite mugs, a trailing plant adds a fresh pop of green, and soft light glows beneath your whitewashed cabinets—effortless and oh-so-inviting.
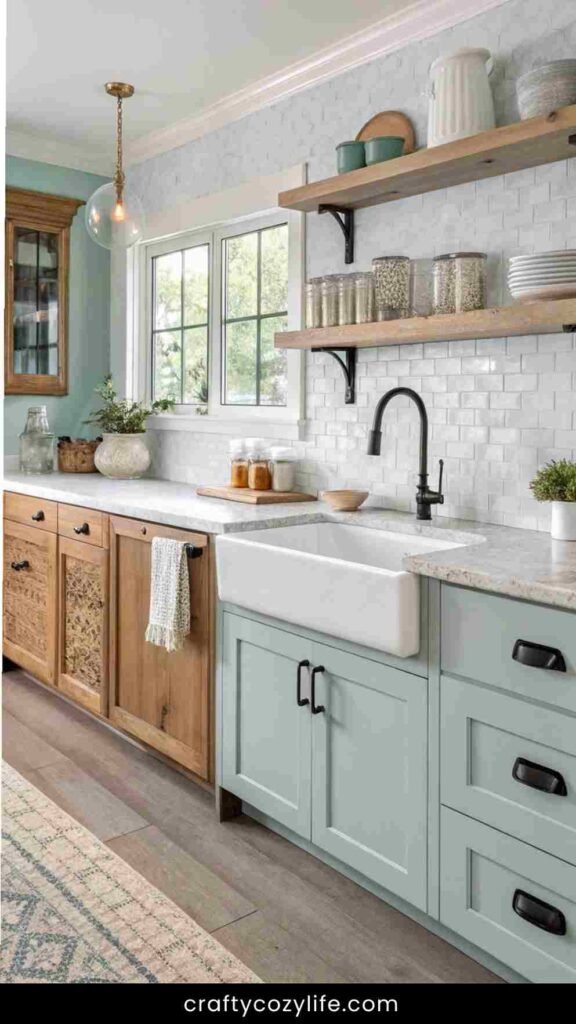
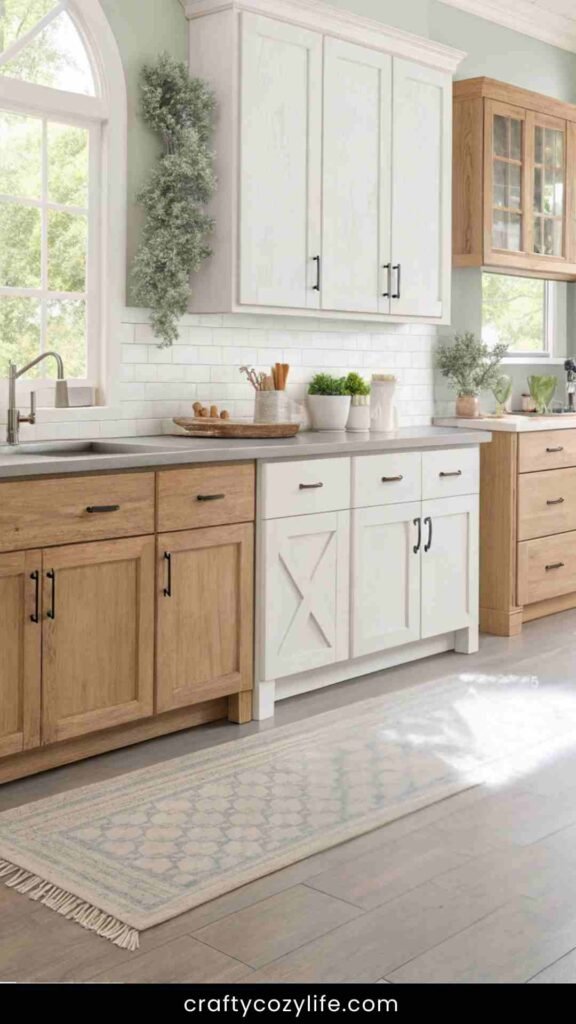
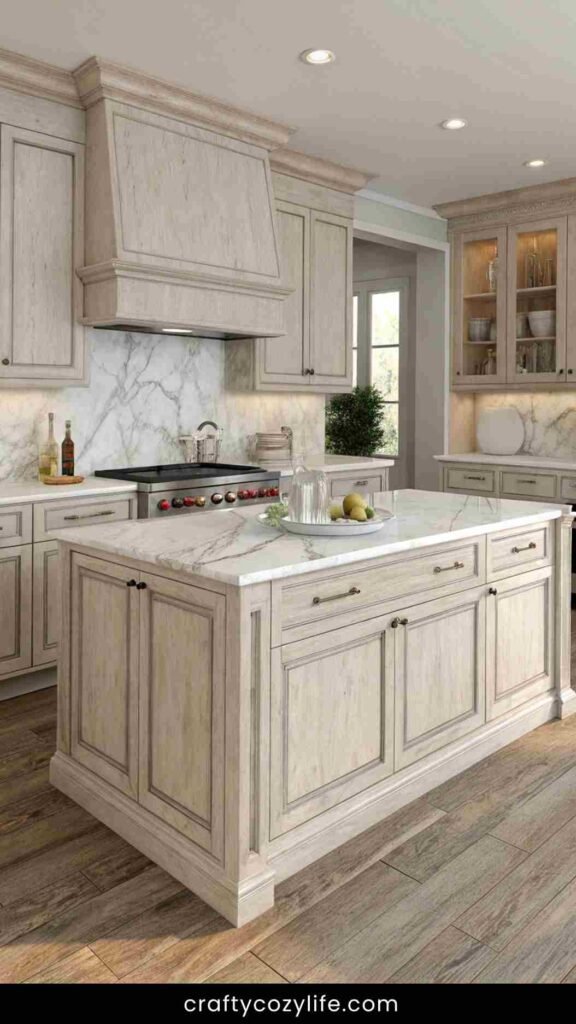
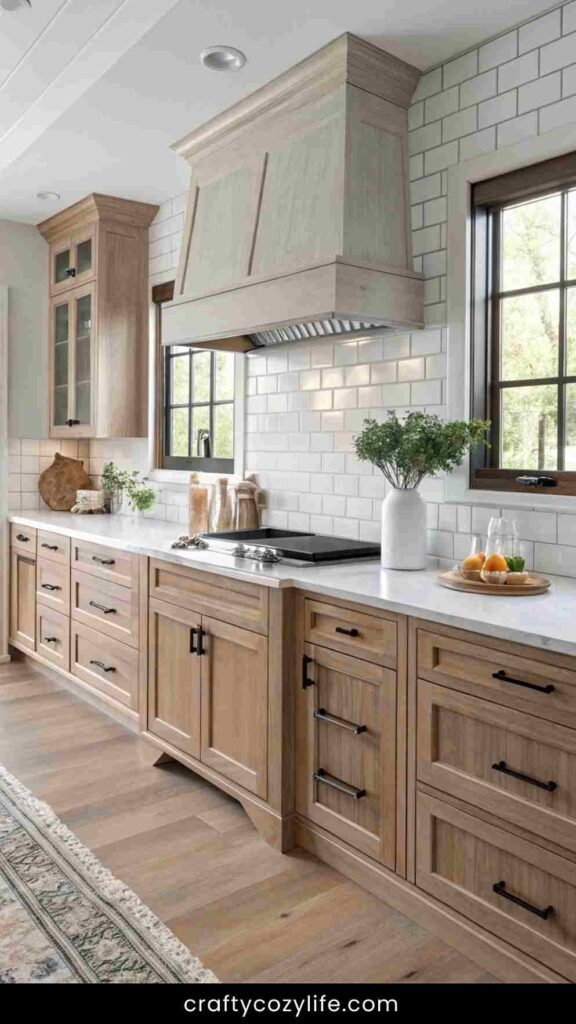
6. Whitewashed Oak Cabinets in Different Kitchen Styles
Whitewashed cabinets work in a variety of styles, so whether you love modern, rustic, or farmhouse aesthetics, you’re covered!
Step-by-Step:
- For a Farmhouse Look: Pair with a butcher block countertop, apron sink, and vintage-inspired decor.
- For a Coastal Vibe: Use light blue or seafoam green accents and natural woven textures.
- For a Modern Take: Pair with sleek black hardware, marble countertops, and minimalist decor.
- For a Boho Feel: Add open shelving, eclectic ceramics, and warm brass accents.
- For a Traditional Kitchen: Incorporate classic subway tile, elegant lighting, and neutral tones.
Picture This:
No matter your style, your whitewashed oak cabinets blend seamlessly, bringing brightness and charm to your kitchen. Whether you’re baking in a farmhouse-style space or sipping wine in a modern, airy kitchen, your cabinets create the perfect backdrop.
7. Maintaining Your Whitewashed Cabinets for Longevity
A little TLC will keep your cabinets looking fresh and beautiful for years to come.
Step-by-Step:
- Clean with a Gentle Solution: Avoid harsh chemicals—use mild soap and water instead.
- Wipe Spills Immediately: Whitewashed finishes can stain if spills sit too long.
- Use a Soft Cloth: Avoid abrasive scrubbers that might scratch the finish.
- Reapply Sealant Annually: A fresh coat of matte sealant every year keeps them protected.
- Avoid Excess Moisture: Be mindful of water exposure, especially near sinks and dishwashers.
Picture This:
Your cabinets remain as stunning as the day you finished them. A quick wipe-down keeps them looking fresh, and the soft, natural wood grain continues to shine through the delicate whitewash.
8. Budget-Friendly Alternatives to Whitewashing Oak Cabinets
If you love the whitewashed look but want an even easier or more budget-friendly approach, here are some alternative methods.
Step-by-Step:
- Use Contact Paper: Peel-and-stick options mimic whitewashed wood with zero mess.
- Try Chalk Paint: A simple, low-cost way to get a similar effect without sanding.
- Use a White Tinted Stain: Faster than traditional whitewashing, this soaks into the wood with minimal effort.
- Apply a Dry Brush Technique: Lightly brushing diluted white paint gives a similar faded effect.
- Consider Cabinet Refacing: If DIY isn’t your thing, a simple veneer update can do the trick.
Picture This:
Even on a budget, your kitchen transforms into a dreamy, light-filled space. Whether you use chalk paint or an easy peel-and-stick solution, you still achieve that coveted whitewashed oak cabinet aesthetic.
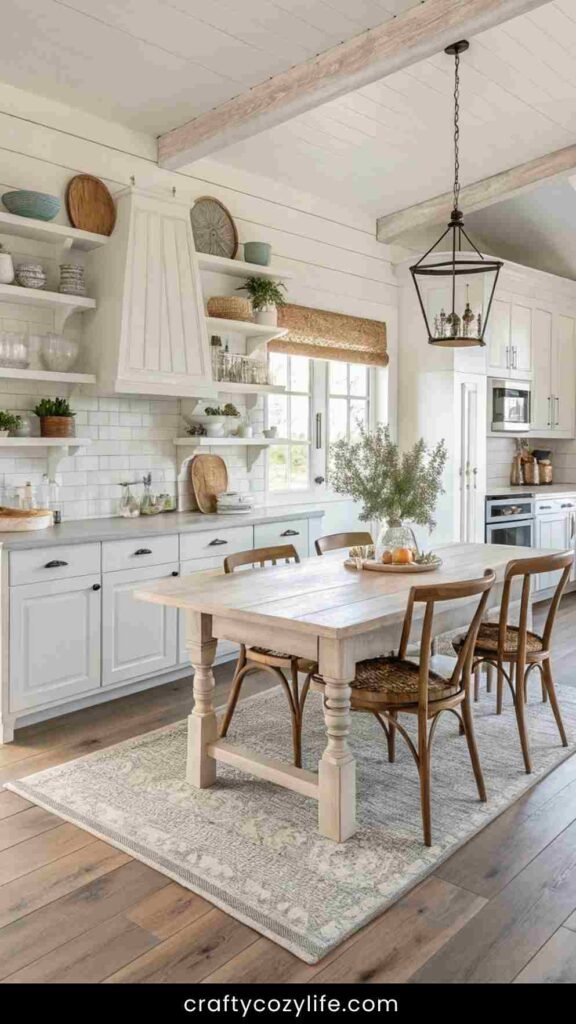
9. Bringing the Whitewashed Look Beyond Cabinets
Love the look? Extend it to other areas of your home for a cohesive, airy feel!
Step-by-Step:
- Whitewash a Dining Table: Tie the look together by updating your wood table.
- Try Whitewashed Floating Shelves: A great way to blend in extra storage with your cabinets.
- Update a Kitchen Island: Whitewashing a wood island creates a perfect centerpiece.
- Transform Wooden Floors: If you’re feeling bold, try whitewashing hardwood floors for a coastal effect.
- Refresh a Wooden Backsplash: If you have a wood backsplash, a whitewash treatment makes it blend seamlessly.
Picture This:
Your kitchen isn’t the only dreamy space anymore—your whole home has a soft, rustic glow. Whitewashed floating shelves hold vintage decor, a dining table carries the same faded wood charm, and your entire space feels light, bright, and effortlessly chic.
10. Pairing Whitewashed Oak Cabinets with Countertops
Your countertops play a huge role in the overall aesthetic of your kitchen, so choosing the right pairing is key.
Step-by-Step:
- Marble Countertops: A classic and elegant choice that adds contrast with subtle veining.
- Butcher Block: Warm and rustic, this pairs beautifully with the soft tones of whitewashed wood.
- Quartz: A durable and low-maintenance option that comes in stunning neutral tones.
- Concrete: For a modern, industrial twist that balances the airy feel of whitewashed oak.
- Granite: Offers natural texture and depth while maintaining a timeless look.
- Soapstone: Dark and dramatic, providing a beautiful contrast against the light cabinets.
Picture This:
Your kitchen island features a sleek marble countertop that catches the morning light, while your whitewashed oak cabinets add warmth and charm. The combination feels fresh, stylish, and effortlessly balanced.
11. The Best Backsplash Options for Whitewashed Oak Cabinets
A backsplash is like the finishing touch on a perfectly curated outfit—it ties everything together!
Step-by-Step:
- Subway Tile: A timeless and versatile option that keeps the kitchen feeling fresh.
- Herringbone Tile: Adds a touch of elegance with a slightly more intricate design.
- Beadboard Paneling: Enhances the rustic charm of whitewashed oak cabinets.
- Mosaic Tiles: For a pop of texture and personality without overwhelming the space.
- Marble Slab: A seamless, high-end look that complements the soft wood grain.
- Brick or Stone: Adds warmth and an organic feel, perfect for a farmhouse aesthetic.
Picture This:
A glossy white subway tile backsplash reflects the natural light pouring into your kitchen. It contrasts beautifully with the soft, rustic finish of your whitewashed oak cabinets, creating a cozy yet modern vibe.
12. Whitewashed Oak Cabinets in Bathroom Vanities
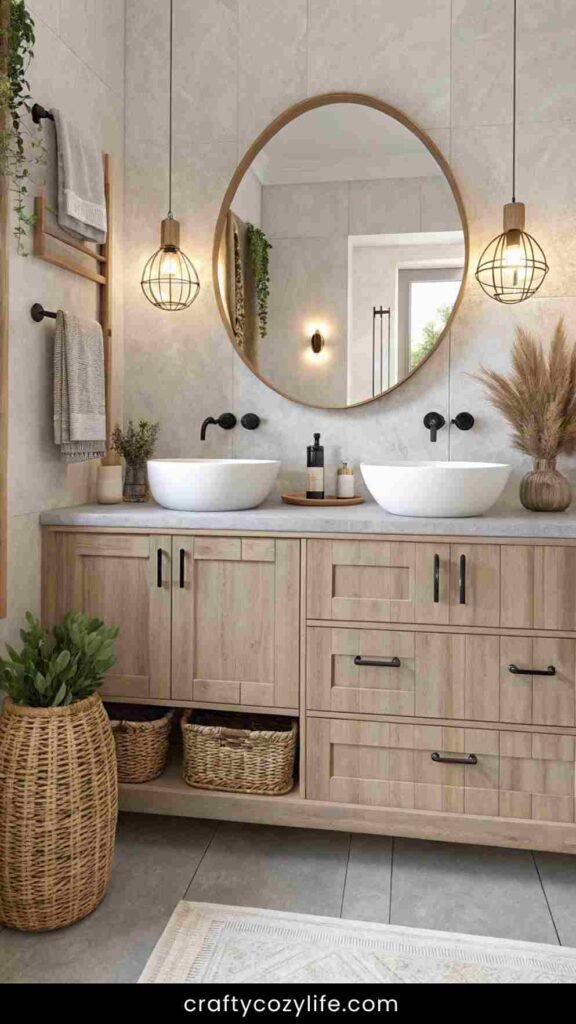
Who says this look is just for kitchens? Whitewashed oak is perfect for creating a serene, spa-like bathroom.
Step-by-Step:
- Choose a Floating Vanity: Gives the space an airy, open feel.
- Pair with a Vessel Sink: Adds a touch of modern elegance.
- Use Brass or Matte Black Hardware: Complements the soft, washed-out wood grain.
- Install Soft, Warm Lighting: Enhances the natural tones of the whitewashed finish.
- Incorporate Natural Elements: Plants, woven baskets, and linen towels complete the look.
- Add a Statement Mirror: A round or arched mirror brings balance and elegance.
Picture This:
A whitewashed oak vanity sits beneath a stunning round mirror, its soft wood tones making the space feel light and serene. A warm glow from wall sconces adds to the calming atmosphere—your bathroom just became your personal oasis.
13. Whitewashed Oak Cabinets in Laundry Rooms
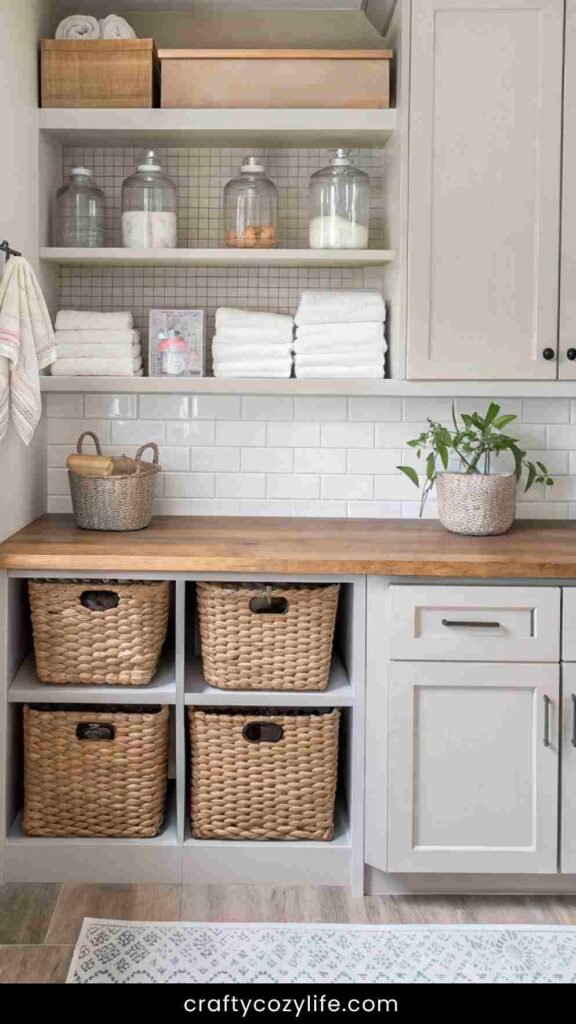
A laundry room makeover may not be at the top of your to-do list, but trust me—this small space deserves some love!
Step-by-Step:
- Install Whitewashed Oak Upper Cabinets: Keep cleaning supplies hidden in style.
- Use Open Shelving: Display neatly folded towels and glass jars of detergent.
- Add a Butcher Block Counter: Perfect for folding laundry with a rustic-chic touch.
- Incorporate Woven Baskets: Adds storage and texture to the space.
- Choose Soft, Neutral Paint Colors: Keep the room feeling open and fresh.
- Hang a Decorative Sign: A cute “Wash & Dry” sign ties it all together.
Picture This:
Your laundry room is no longer just functional—it’s a Pinterest-worthy retreat. Whitewashed oak cabinets create a soft, cozy atmosphere, and woven baskets neatly hold all your essentials. Even doing laundry feels a little more enjoyable!
14. Whitewashed Oak Cabinets in Home Offices
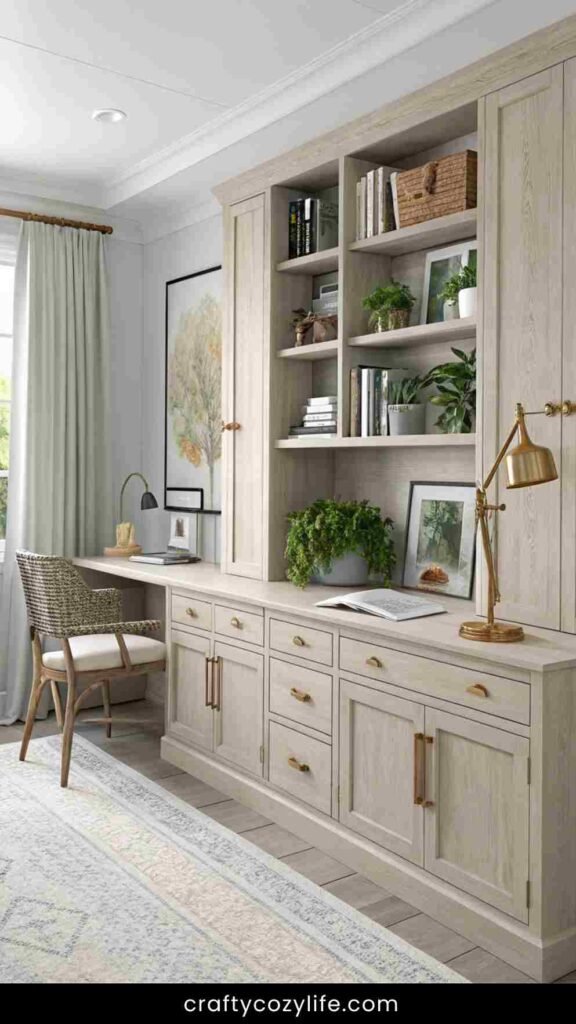
Working from home? Whitewashed oak cabinets can add warmth and charm to your office space, making it a place you actually enjoy spending time in.
Step-by-Step:
- Use Whitewashed Oak for Built-in Storage: Keep clutter at bay while maintaining a light, airy feel.
- Add Open Shelving: Display books, decor, and productivity-boosting greenery.
- Choose a Whitewashed Desk: A cohesive, rustic-modern look.
- Pair with Soft Linen Curtains: Keeps the room bright yet cozy.
- Use Brass or Black Metal Accents: Elevates the space with a touch of sophistication.
- Incorporate Cozy Lighting: A stylish desk lamp or warm-toned pendant light completes the ambiance.
Picture This:
Your home office is no longer a dull, cluttered corner—it’s a beautifully curated space with soft whitewashed wood tones, warm lighting, and an inviting atmosphere that makes you actually want to get work done.
Frequently Asked Questions
1. Are whitewashed oak cabinets durable?
Yes! Whitewashing doesn’t compromise the durability of oak cabinets. As long as you seal them properly with a clear matte or satin topcoat, they will resist moisture and wear. Regular cleaning and maintenance will keep them looking fresh for years.
2. Can I whitewash cabinets that already have a stain or finish?
Absolutely! However, you’ll need to prep them first by sanding off the existing finish so the whitewash can adhere properly. If the original stain is very dark, you may need to use a wood conditioner or primer to ensure an even whitewashed effect.
3. What’s the difference between whitewashing and painting cabinets?
Whitewashing allows the natural wood grain to show through, creating a softer, rustic look. Painting, on the other hand, provides solid, opaque coverage, hiding the wood grain completely. If you want a more natural, textured finish, whitewashing is the way to go!
4. Can I use whitewashing on other types of wood besides oak?
Yes! While oak is a fantastic choice because of its strong grain pattern, you can whitewash pine, maple, and even reclaimed wood. Just keep in mind that different woods absorb the whitewash differently, so test a small section first.
5. How do I clean and maintain whitewashed oak cabinets?
To keep your cabinets looking their best:
- Wipe them down regularly with a soft, damp cloth.
- Avoid harsh chemicals—mild soap and water work best.
- Dry spills immediately to prevent staining.
- Apply a fresh coat of sealant every year for extra protection.
Closing Thoughts
Whitewashed oak cabinets are the perfect blend of rustic charm and modern elegance. Whether you’re giving your kitchen a fresh update, adding warmth to your bathroom, or creating a cozy laundry room, this timeless finish brings brightness and character to any space.
The best part? Whitewashing is an affordable and DIY-friendly project that lets you transform your cabinets without the hassle of a full remodel. Plus, it pairs beautifully with a variety of styles—farmhouse, coastal, modern, and beyond.
So, are you ready to take the plunge and give your cabinets that dreamy, light-washed look? Whether you go the full DIY route or opt for a pro, one thing’s for sure—your home is about to get a whole lot cozier.
Let me know in the comments—are you team DIY, or would you rather leave it to the experts? Either way, I’d love to hear about your plans!